The following tennis lesson helps you develop the modern forehand technique, which allows you to hit forehands with effortless power while maintaining high consistency of your shots.
Most tennis players struggle with forehands when they have to finish short balls or when they try to dictate the rallies from the baseline because they don’t know how to engage the right muscles and in what sequence to hit powerful forehands.
This step-by-step instruction guide gives you the fundamentals of the forehand technique that will allow you to quickly improve your forehand.
how to develop more power on your forehand with the help of drills based on biomechanics,
how to eliminate technical flaws that cause you to play inconsistently,
how to learn the techniques of the neutral, closed and open stance forehands,
and much more.
If you would like to have a handy Forehand Technique checklist of all the steps described in this article so you can use it on your smartphone as a reminder on the court, then share this guide with your friends and get access to the checklist.
How you grip the racket is very important for your forehand because the grip translates the feel from the racket strings that interact with the ball to your hand. Therefore, you feel what’s going on with the ball, and you know how to manipulate it.
If something is not right with the grip, then your forehands will not have good control regardless of how your other external technique looks.
While you may know how to hold a semi-western grip – which is what I recommend for a stable and reliable forehand stroke – you may still hold the handle incorrectly.
The most common mistake is that the hand is perpendicular to the handle. When players holds the racket like that, they are not supporting the racket well because the index finger is not spread out.
This grip mistake is quite common
That makes the racket head feel very heavy. To control it, you’ll have to tense up your wrist muscles, which will cause you to lose feel of the racket head and consequently have trouble playing accurately.
The correct grip would be when we spread the fingers a little bit so that you see the index finger under the racket (see picture).
This little detail can help you hit forehands much easier
The reason we want the index finger there is that it helps us push the racket head up.
When we are swinging towards the ball and applying topspin, this finger helps us turn the wrist and drive the racket upwards.
Index finger can easily support the weight of the racket
It gives us very good support under the racket, and the racket rests nicely.
So, check how your current forehand grip looks and make sure you add this little index finger technique in there so that your racket will be more stable in your hand.
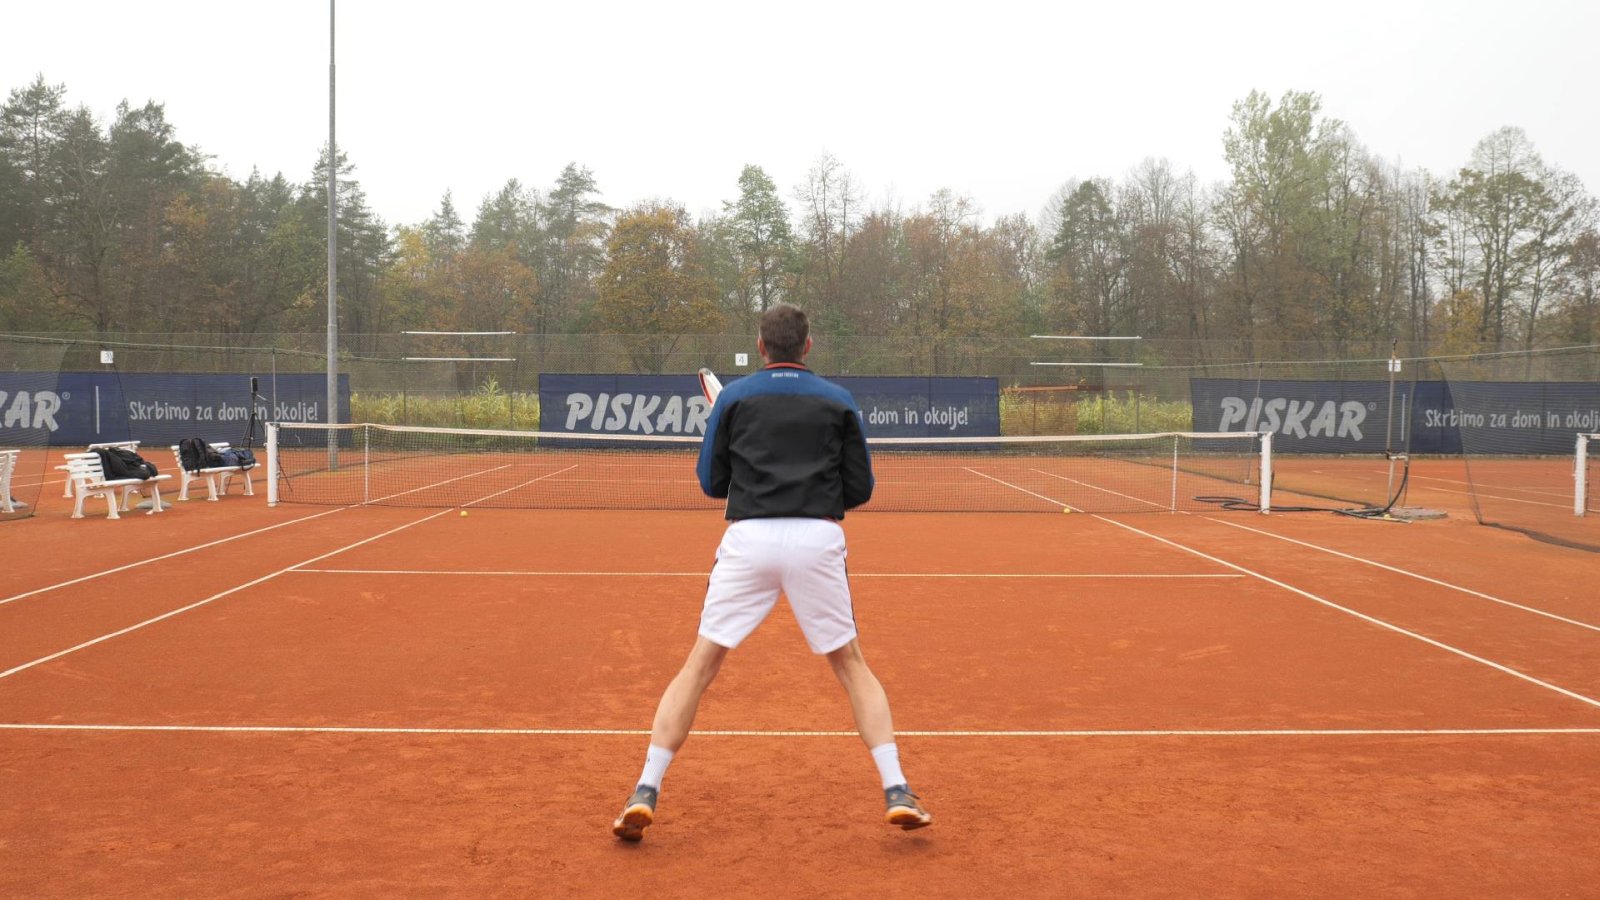
Step 2: The Ready Position & State
Now that we’ve set the grip right, we need to get in a ready position. I often see players in a ready position, but they’re not in a ready state because they’re just standing.
Standing like this does not make you "ready"
They’re waiting to see the ball go in a certain direction and only then do they start playing. That’s a ready position but not a ready state.
In a ready state, you are moving. You feel like you’re dancing.
You can be dancing from foot to foot, or you can be doing something like mini split steps, but you have to do something.
Whenever the ball is in play, we never stand, not even for a split second. We are always moving.
A perfect example of a ready position AND ready state
There are two main reasons you want to keep moving:
we are able to move faster with our first step, especially when we land into a split step,
we are able to react faster because body movement keeps our mind more alert.
Now even though I am explaining the modern forehand tennis technique, I still wanted to include the ready position and state because they are so important for your ability to play good tennis.
Remember: if you’re not moving and if you’re not doing a split step, you’re not really playing tennis.
Make sure that you add this to your game because, otherwise, you will never play well. It’s impossible to play tennis well if you’re just standing and if you don’t split step.
Step 3: The Preparation
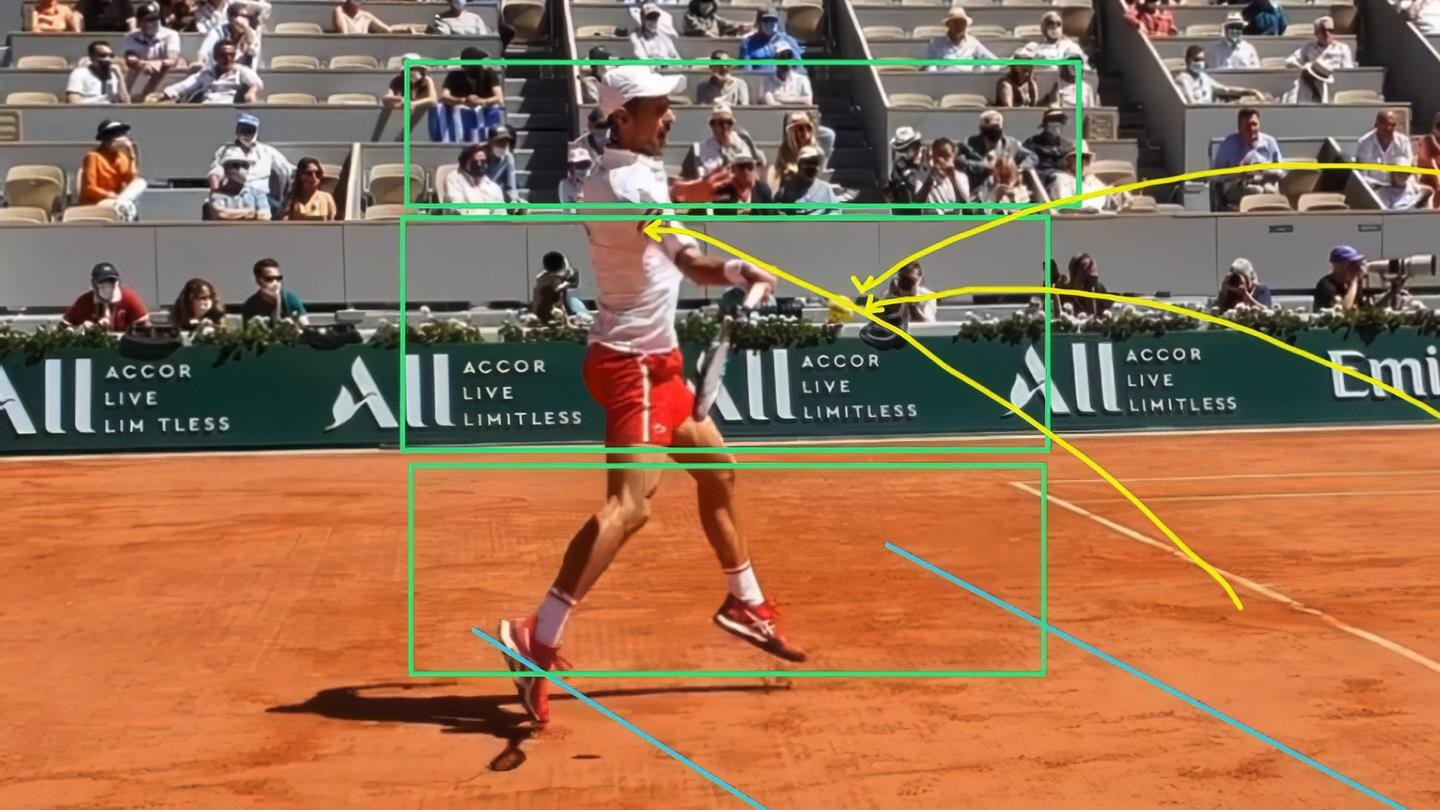
The first thing you do when you see the ball coming to your forehand side is that you turn to the side.
The most common mistake is to use your arm a lot to go back; instead, you should turn to the side, and you should prepare the racket mostly with your off-hand.
This should feel like you are pushing and lifting the racket with your left hand
When you’re turning to the side, your right hand is basically resting on the racket and your left arm is doing all the work preparing.
Another common mistake you might make in this preparation phase is that you might think too much about preparing the racket “back”.
So, don’t imagine it like that. Just think that you will prepare to the side.
The rest will just happen during the stroke as you step towards the ball and turn the body more.
When you prepare correctly holding the semi-western grip, then the racket face and your non-dominant hand are pointing to the side.
Forehand preparation from the side view
The wrist of your hitting hand is just below the height of your shoulder, and your arm is slightly bent.
Step 4: The Drop
From the preparation phase, you should let the racket drop so that gravity can assist you with accelerating the racket. In a later stage of the forward swing, you will start to take over with your hitting arm.
Remember: if you want to hit an effortless and efficient forehand, then you want to use laws of physics to your advantage and make the best of them.
One of them is gravity, and you can use it only if you let go. Instead of “doing” everything yourself with your arm, you let gravity help you accelerate the racket initially.
VERY IMPORTANT: The “drop” is just a term we use in coaching but it is often taken TOO LITERALLY. The racket doesn’t just drop down, it swings around too because we rotate the body back and forth. I explain that in the Universal Swing video article.
What I teach and recommend in this phase where you are building the fundamentals of the forehand technique is that you DON’T copy the tennis pros and how they drop the racket.
Most of them drop the racket with the face pointing down where they completely relax the wrist before accelerating forward.
Roger Federer and many other pros drop the racket with the face pointing to the ground
This is an advanced method of accelerating the racket head. While you can learn it, it is very unlikely that you will be able to control your shots.
You will most likely be late on the forehand and hit most of them very inaccurately.
That’s because the racket head will flip close to 180 degrees in a very short time, just a few hundredths of a second before you make contact.
Please check the comparison of the forehand drop techniques between Roger Federer and Simona Halep and why it’s so difficult to apply the “face down” drop technique that Roger uses and why I don’t recommend it to recreational tennis players.
Simona Halep forehand drop on the edge vs Roger Federer drop on the face of the racket
While I can demonstrate this forehand flip technique, I find it very difficult to control my shots.
I am probably a 5.5 NTRP level, yet I don’t use that technique. Rather, my forehand technique is much simpler, which allows me more margin of error and gives me much higher consistency and accuracy.
The key to this technique is that you drop the racket in the direction of the back edge.
Juan Martin Del Potro drops the racket "on the edge" which is a simpler yet still very effective technique
(Image credit: Both images from above have been taken from the videos of the Tennis Unleashed Youtube channel which I highly recommend if you’re into slow motion videos of the pros and expert advice of coach Jason Frausto.)
In other words, you simply let your wrist turn backwards, almost like you are waving.
When you do that, your wrist will be almost laid back (it will fully lay back in the next step!) and it will fall into the exact position in relation to the forearm that it has to be when you make contact with the ball.
Therefore, you don’t have to “find” this laid-back wrist position just a split second before contact – and possibly miss it. Your wrist will get into a very stable position early in the swing and simplify the stroke for you.
I drop the racket head in the direction of the edge
The important part in this drop-on-the-edge technique is that, as soon as your wrist starts turning, you let the racket drop fully and then you gradually take over and accelerate it.
If you have a hitch or a pause in your drop where the wrist will stay still for a split second, then you won’t feel the real benefit of this technique because it works only if the whole forehand stroke is executed in a continuous manner.
Once you master this technique of dropping the racket on the edge and hitting consistent forehands, your forehand technique may simply evolve through repetition – and not through conscious mechanical teaching – into a flip technique that the pros use.
Again, I have played for 30 years at quite a high recreational level, yet my forehand has never evolved into that technique. As such, I have strong reservations about the pro technique used by recreational tennis players.
We should use simple and effective techniques because that’s what we are capable of doing based on the amount of training we invest into our tennis game.
Del Potro and many other pros (especially women) are examples of how a more simple forehand drop technique still works at the high level of tennis and therefore it can work for you too.
Step 5: The Acceleration
You’ve gone through the preparation and the tipping point, and you’ve released the racket on the edge.
Now gravity is taking over. It’s starting to accelerate the racket.
We come to the next phase where the acceleration of the racket starts.
The way the racket starts to accelerate or your arm starts to move forward is that it first has to lag a little bit.
What needs to happen here is that your hips need to start to rotate first, when your arm is starting to drop.
Simply imagine your hips turning 90 degrees for now in this fundamental stage of building the forehand.
In most cases, your hips won’t rotate that much before contact, but you need to exaggerate the movement for you to feel it.
If, while your hips are rotating, you keep a relatively loose arm (since you are just letting it fall in the drop using gravity), then your arm will lag a bit.
In this fundamental phase, I don’t recommend you focus on lagging the arm much.
However, I do recommend that you become aware of the wrist lag.
That creates a certain stretch effect in the forearm which helps us accelerate the racket head into the ball very effortlessly.
The wrist will fall back and lag if you rotate your hips forward while dropping the racket
It’s very important to understand that, when the racket head lags and the wrist is fully laid back, this happens by itself.
We don’t “do” that by taking the racket back and flexing our wrist. It happens because we have a relatively loose wrist and we are rotating our body towards the ball; therefore, the racket falls behind – it lags.
That’s why I teach dropping the racket on the edge (in the previous step).
It prepares the wrist in the right position so that, when the body starts to turn forward, the wrist will fall exactly into the right position for the contact of the ball in relation to the forearm.
The racket (and wrist) will lag more as I start to rotate my body forward
The result is that you will not be confused intellectually or feel-wise about how the wrist must be.
It will simply fall into place exactly how it should be to give you power (through the stretch effect) and control (through being stable as it’s fully laid back).
Step 6: The Swing Path
Now that the racket is accelerating forward, we need to steer it into the correct swing path that will help us control the ball well.
The swing path is a straight line before and after contact.
The reason we need to swing in a straight line for a part of our swing is that we cannot perfectly time the ball.
If we keep swinging in a circular motion and we mistime the forehand by just a few hundredths of a second, we will hit the ball with a slightly different racket angle.
And just a small change in the racket angle at contact creates a very big change in where the ball will land on the other side of the court.
By swinging in a straight line, we ensure that the racket head is directing the ball towards our intended target even if we hit the ball slightly too early or slightly too late.
One way to describe this swing path is to imagine more of a bowling motion rather than a discus throw motion that typically happens when you imagine a circular path.
The forehand swing path is very similar to a bowling motion
To get the feel for the bowling motion, you can simply take a few tennis balls and bowl them towards a target.
After 20 or so repetitions, take your racket and see if you can implement this feeling of bowling into your swing.
Important: The bowling motion is the fundamental swing path of the forehand as it helps us feel the effect of the gravity that helped us accelerate the racket and it allows us to play consistently and accurately.
The fundamental forehand swing path that we want to develop first
It also happens quite naturally when we are receiving a relatively low ball where we can swing in a more downwards motion.
But when you receive a higher ball, you will have to adjust your swing, which will be more horizontal and actually closer to a discus throw.
This swing will be relaxed and efficient only if the player has mastered the fundamental "downwards" swing
Keep in mind that that is a variation of the fundamental forehand swing and that it will work well only if you have mastered the “bowling” swing path first.
If you don’t have a good feel of how to drop the racket with the help of gravity and swing it effortlessly, then this more horizontal swing will feel very stiff and pushy and your forehands won’t be hit effortlessly and with good pace.
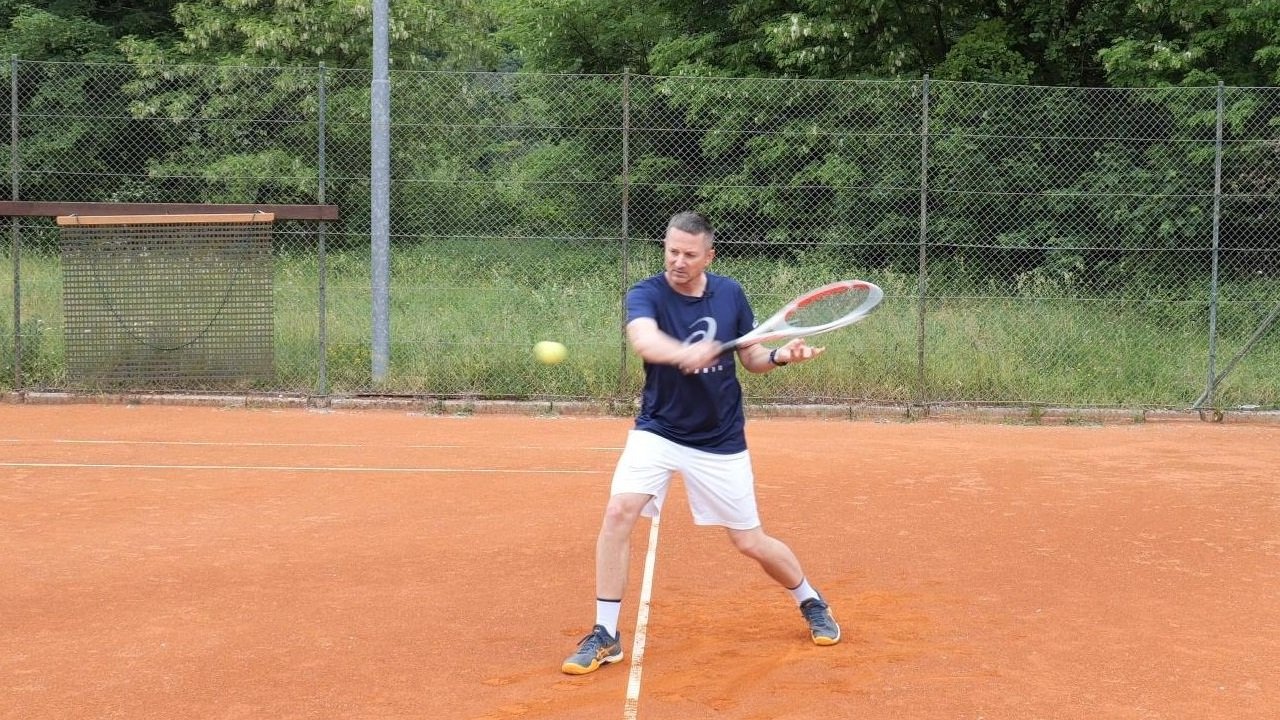
Step 7: Contact & Extension
We’ve now reached the ball in our swing and have to contact the ball. If we want to apply some control to the ball, we want to spin it a little bit.
To teach the spin, I prefer to explain it as rolling the ball rather than brushing the ball, which is most commonly used.
“Brushing” tends to create an incorrect mental image where you’re approaching the ball with your racket, but then you only brush it with an upwards motion. The ball doesn’t get any forward force, so it ends up short and with no pace.
I prefer the compress & roll approach first, which of course is an exaggerated way of hitting the ball. You can quickly get the gist of it and accelerate that movement into the actual swing speed that you’ll use to hit the ball.
Pressing & Rolling is a better mental image of how to hit a topspin forehand
As I’ve mentioned in the swing path part, we want to swing straight through the ball to improve the accuracy of our shots.
In this part, after the contact, we usually explain it as extending after the ball.
You can imagine just following the ball for a bit to develop this extension. That is a more mechanical approach, but I would also like to mention the actual cause of extension that happens with more advanced players.
Note how Urban and I extend after the contact to guide the ball where we want
The reason I, for example, extend after the ball is because I am aiming and guiding the ball towards a certain target I have in mind.
In other words, I have a very clear intention of how and where I want to play the ball.
This clear intention and my desire to hit the forehand accurately naturally result in my extending after the ball in the same way as you would naturally extend your arm forward if you were bowling the ball and aiming towards a certain target.
The extension happens naturally if you have a clear intention and you are aiming into a specific target.
I have found in my work with hundreds of recreational tennis players that they rarely have a clear intention and that they often don’t aim accurately at the moment of contacting the ball.
And that’s why they don’t extend after the ball and don’t execute this part of the forehand technique correctly.
Having a clear and early intention of what exactly you want to do with the ball is extremely important for your ability to play consistently and accurately as it will directly affect your stroke technique.
We have been directing the ball and extending through the contact zone, and now we just need to complete our stroke in the follow-through.
On the forehand, I teach my players to catch the racket. I recommend that you work on catching the racket with your left hand somewhere above your shoulder in this position because, when you catch the racket, your left arm and your left shoulder will go out of the way.
A basic forehand follow-through technique that in time can adjust to different shots
The most common mistake on the forehand follow-through is that the left arm just drops dead and the right arm ends up alone in the follow-through. Then the shoulders tend to fight each other – they’re blocking each other – so the hitting arm cannot easily swing through the ball.
When we catch the racket, then our shoulders can move freely through the shot. That helps us generate more power and move much more efficiently.
The 8 steps to a modern tennis forehand technique is a method of developing the fundamentals of the forehand which should be applicable to all recreational and junior tennis players, especially if they are struggling with the forehand.
If you are saying that it’s different than how most of the pros play, you’re right. But, be realistic in your expectations of what your current skill level is.
Consider that these are the most talented people in the world. They started very young and spent thousands of hours working on their forehand technique under the supervision of an experienced coach.
My friend Urban and I play at a very high recreational level of tennis, yet we don’t fully apply the forehand drop and flip techniques because they are extremely demanding.
Our forehands are excellent even for high level recreational play. Neither of us has any problems putting opponents under pressure from the baseline or finishing short balls when we have to.
While this article and its corresponding video above are extensive, they represent less than 10% of the instruction I provide in the full Effortless Forehand video course, which includes more than 4 hours of video instruction.
The Effortless Forehand course shows you various practical drills that help you develop the forehand techniques described above.
It teaches you how to engage your bigger muscles in the body for effortless power through drills based on biomechanics, and it teaches you all the major stances and footwork patterns that allow you to hit quality forehands from any situation.
If you have any questions or thoughts about developing the fundamental tennis forehand technique described above, just use the comments section below.
The following tennis lesson helps you develop the modern forehand technique, which allows you to hit forehands with effortless power while maintaining high consistency of your shots.
Most tennis players struggle with forehands when they have to finish short balls or when they try to dictate the rallies from the baseline because they don’t know how to engage the right muscles and in what sequence to hit powerful forehands.
This step-by-step instruction guide gives you the fundamentals of the forehand technique that will allow you to quickly improve your forehand.
how to develop more power on your forehand with the help of drills based on biomechanics,
how to eliminate technical flaws that cause you to play inconsistently,
how to learn the techniques of the neutral, closed and open stance forehands,
and much more.
If you would like to have a handy Forehand Technique checklist of all the steps described in this article so you can use it on your smartphone as a reminder on the court, then share this guide with your friends and get access to the checklist.
How you grip the racket is very important for your forehand because the grip translates the feel from the racket strings that interact with the ball to your hand. Therefore, you feel what’s going on with the ball, and you know how to manipulate it.
If something is not right with the grip, then your forehands will not have good control regardless of how your other external technique looks.
While you may know how to hold a semi-western grip – which is what I recommend for a stable and reliable forehand stroke – you may still hold the handle incorrectly.
The most common mistake is that the hand is perpendicular to the handle. When players holds the racket like that, they are not supporting the racket well because the index finger is not spread out.
This grip mistake is quite common
That makes the racket head feel very heavy. To control it, you’ll have to tense up your wrist muscles, which will cause you to lose feel of the racket head and consequently have trouble playing accurately.
The correct grip would be when we spread the fingers a little bit so that you see the index finger under the racket (see picture).
This little detail can help you hit forehands much easier
The reason we want the index finger there is that it helps us push the racket head up.
When we are swinging towards the ball and applying topspin, this finger helps us turn the wrist and drive the racket upwards.
Index finger can easily support the weight of the racket
It gives us very good support under the racket, and the racket rests nicely.
So, check how your current forehand grip looks and make sure you add this little index finger technique in there so that your racket will be more stable in your hand.
Step 2: The Ready Position & State
Now that we’ve set the grip right, we need to get in a ready position. I often see players in a ready position, but they’re not in a ready state because they’re just standing.
Standing like this does not make you “ready”
They’re waiting to see the ball go in a certain direction and only then do they start playing. That’s a ready position but not a ready state.
In a ready state, you are moving. You feel like you’re dancing.
You can be dancing from foot to foot, or you can be doing something like mini split steps, but you have to do something.
Whenever the ball is in play, we never stand, not even for a split second. We are always moving.
A perfect example of a ready position AND ready state
There are two main reasons you want to keep moving:
we are able to move faster with our first step, especially when we land into a split step,
we are able to react faster because body movement keeps our mind more alert.
Now even though I am explaining the modern forehand tennis technique, I still wanted to include the ready position and state because they are so important for your ability to play good tennis.
Remember: if you’re not moving and if you’re not doing a split step, you’re not really playing tennis.
Make sure that you add this to your game because, otherwise, you will never play well. It’s impossible to play tennis well if you’re just standing and if you don’t split step.
Step 3: The Preparation
The first thing you do when you see the ball coming to your forehand side is that you turn to the side.
The most common mistake is to use your arm a lot to go back; instead, you should turn to the side, and you should prepare the racket mostly with your off-hand.
This should feel like you are pushing and lifting the racket with your left hand
When you’re turning to the side, your right hand is basically resting on the racket and your left arm is doing all the work preparing.
Another common mistake you might make in this preparation phase is that you might think too much about preparing the racket “back”.
So, don’t imagine it like that. Just think that you will prepare to the side.
The rest will just happen during the stroke as you step towards the ball and turn the body more.
When you prepare correctly holding the semi-western grip, then the racket face and your non-dominant hand are pointing to the side.
Forehand preparation from the side view
The wrist of your hitting hand is just below the height of your shoulder, and your arm is slightly bent.
Step 4: The Drop
From the preparation phase, you should let the racket drop so that gravity can assist you with accelerating the racket. In a later stage of the forward swing, you will start to take over with your hitting arm.
Remember: if you want to hit an effortless and efficient forehand, then you want to use laws of physics to your advantage and make the best of them.
One of them is gravity, and you can use it only if you let go. Instead of “doing” everything yourself with your arm, you let gravity help you accelerate the racket initially.
VERY IMPORTANT: The “drop” is just a term we use in coaching but it is often taken TOO LITERALLY. The racket doesn’t just drop down, it swings around too because we rotate the body back and forth. I explain that in the Universal Swing video article.
What I teach and recommend in this phase where you are building the fundamentals of the forehand technique is that you DON’T copy the tennis pros and how they drop the racket.
Most of them drop the racket with the face pointing down where they completely relax the wrist before accelerating forward.
Roger Federer and many other pros drop the racket with the face pointing to the ground
This is an advanced method of accelerating the racket head. While you can learn it, it is very unlikely that you will be able to control your shots.
You will most likely be late on the forehand and hit most of them very inaccurately.
That’s because the racket head will flip close to 180 degrees in a very short time, just a few hundredths of a second before you make contact.
Please check the comparison of the forehand drop techniques between Roger Federer and Simona Halep and why it’s so difficult to apply the “face down” drop technique that Roger uses and why I don’t recommend it to recreational tennis players.
Simona Halep forehand drop on the edge vs Roger Federer drop on the face of the racket
While I can demonstrate this forehand flip technique, I find it very difficult to control my shots.
I am probably a 5.5 NTRP level, yet I don’t use that technique. Rather, my forehand technique is much simpler, which allows me more margin of error and gives me much higher consistency and accuracy.
The key to this technique is that you drop the racket in the direction of the back edge.
Juan Martin Del Potro drops the racket “on the edge” which is a simpler yet still very effective technique
(Image credit: Both images from above have been taken from the videos of the Tennis Unleashed Youtube channel which I highly recommend if you’re into slow motion videos of the pros and expert advice of coach Jason Frausto.)
In other words, you simply let your wrist turn backwards, almost like you are waving.
When you do that, your wrist will be almost laid back (it will fully lay back in the next step!) and it will fall into the exact position in relation to the forearm that it has to be when you make contact with the ball.
Therefore, you don’t have to “find” this laid-back wrist position just a split second before contact – and possibly miss it. Your wrist will get into a very stable position early in the swing and simplify the stroke for you.
I drop the racket head in the direction of the edge and then smoothly accelerate forward
The important part in this drop-on-the-edge technique is that, as soon as your wrist starts turning, you let the racket drop fully and then you gradually take over and accelerate it.
If you have a hitch or a pause in your drop where the wrist will stay still for a split second, then you won’t feel the real benefit of this technique because it works only if the whole forehand stroke is executed in a continuous manner.
Once you master this technique of dropping the racket on the edge and hitting consistent forehands, your forehand technique may simply evolve through repetition – and not through conscious mechanical teaching – into a flip technique that the pros use.
Again, I have played for 30 years at quite a high recreational level, yet my forehand has never evolved into that technique. As such, I have strong reservations about the pro technique used by recreational tennis players.
We should use simple and effective techniques because that’s what we are capable of doing based on the amount of training we invest into our tennis game.
Del Potro and many other pros (especially women) are examples of how a more simple forehand drop technique still works at the high level of tennis and therefore it can work for you too.
Step 5: The Acceleration
You’ve gone through the preparation and the tipping point, and you’ve released the racket on the edge.
Now gravity is taking over. It’s starting to accelerate the racket.
We come to the next phase where the acceleration of the racket starts.
The way the racket starts to accelerate or your arm starts to move forward is that it first has to lag a little bit.
What needs to happen here is that your hips need to start to rotate first, when your arm is starting to drop.
Simply imagine your hips turning 90 degrees for now in this fundamental stage of building the forehand.
In most cases, your hips won’t rotate that much before contact, but you need to exaggerate the movement for you to feel it.
If, while your hips are rotating, you keep a relatively loose arm (since you are just letting it fall in the drop using gravity), then your arm will lag a bit.
In this fundamental phase, I don’t recommend you focus on lagging the arm much.
However, I do recommend that you become aware of the wrist lag.
That creates a certain stretch effect in the forearm which helps us accelerate the racket head into the ball very effortlessly.
The wrist will fall back and lag if you rotate your hips forward while dropping the racket
It’s very important to understand that, when the racket head lags and the wrist is fully laid back, this happens by itself.
We don’t “do” that by taking the racket back and flexing our wrist. It happens because we have a relatively loose wrist and we are rotating our body towards the ball; therefore, the racket falls behind – it lags.
That’s why I teach dropping the racket on the edge (in the previous step).
It prepares the wrist in the right position so that, when the body starts to turn forward, the wrist will fall exactly into the right position for the contact of the ball in relation to the forearm.
The racket lag that you see happened by itself – I didn’t “do” it. I let it happen.
The result is that you will not be confused intellectually or feel-wise about how the wrist must be.
It will simply fall into place exactly how it should be to give you power (through the stretch effect) and control (through being stable as it’s fully laid back).
Step 6: The Swing Path
Now that the racket is accelerating forward, we need to steer it into the correct swing path that will help us control the ball well.
The swing path is a straight line before and after contact.
The reason we need to swing in a straight line for a part of our swing is that we cannot perfectly time the ball.
If we keep swinging in a circular motion and we mistime the forehand by just a few hundredths of a second, we will hit the ball with a slightly different racket angle.
And just a small change in the racket angle at contact creates a very big change in where the ball will land on the other side of the court.
By swinging in a straight line, we ensure that the racket head is directing the ball towards our intended target even if we hit the ball slightly too early or slightly too late.
One way to describe this swing path is to imagine more of a bowling motion rather than a discus throw motion that typically happens when you imagine a circular path.
The forehand swing path is very similar to a bowling motion
To get the feel for the bowling motion, you can simply take a few tennis balls and bowl them towards a target.
After 20 or so repetitions, take your racket and see if you can implement this feeling of bowling into your swing.
Important: The bowling motion is the fundamental swing path of the forehand as it helps us feel the effect of the gravity that helped us accelerate the racket and it allows us to play consistently and accurately.
The fundamental forehand swing path that we want to develop first is more downwards initially
It also happens quite naturally when we are receiving a relatively low ball where we can swing in a more downwards motion.
But when you receive a higher ball, you will have to adjust your swing, which will be more horizontal and actually closer to a discus throw.
How the swing adjusts to a higher contact point
Keep in mind that that is a variation of the fundamental forehand swing and that it will work well only if you have mastered the “bowling” swing path first.
If you don’t have a good feel of how to drop the racket with the help of gravity and swing it effortlessly, then this more horizontal swing will feel very stiff and pushy and your forehands won’t be hit effortlessly and with good pace.
Step 7: Contact & Extension
We’ve now reached the ball in our swing and have to contact the ball. If we want to apply some control to the ball, we want to spin it a little bit.
To teach the spin, I prefer to explain it as rolling the ball rather than brushing the ball, which is most commonly used.
“Brushing” tends to create an incorrect mental image where you’re approaching the ball with your racket, but then you only brush it with an upwards motion. The ball doesn’t get any forward force, so it ends up short and with no pace.
I prefer the compress & roll approach first, which of course is an exaggerated way of hitting the ball. You can quickly get the gist of it and accelerate that movement into the actual swing speed that you’ll use to hit the ball.
Pressing & Rolling is a better mental image of how to hit a topspin forehand
As I’ve mentioned in the swing path part, we want to swing straight through the ball to improve the accuracy of our shots.
In this part, after the contact, we usually explain it as extending after the ball.
You can imagine just following the ball for a bit to develop this extension. That is a more mechanical approach, but I would also like to mention the actual cause of extension that happens with more advanced players.
Note how Urban and I extend after the contact to guide the ball where we want
The reason I, for example, extend after the ball is because I am aiming and guiding the ball towards a certain target I have in mind.
In other words, I have a very clear intention of how and where I want to play the ball.
This clear intention and my desire to hit the forehand accurately naturally result in my extending after the ball in the same way as you would naturally extend your arm forward if you were bowling the ball and aiming towards a certain target.
The extension happens naturally if you have a clear intention and you are aiming into a specific target.
I have found in my work with hundreds of recreational tennis players that they rarely have a clear intention and that they often don’t aim accurately at the moment of contacting the ball.
And that’s why they don’t extend after the ball and don’t execute this part of the forehand technique correctly.
Having a clear and early intention of what exactly you want to do with the ball is extremely important for your ability to play consistently and accurately as it will directly affect your stroke technique.
We have been directing the ball and extending through the contact zone, and now we just need to complete our stroke in the follow-through.
On the forehand, I teach my players to catch the racket. I recommend that you work on catching the racket with your left hand somewhere above your shoulder in this position because, when you catch the racket, your left arm and your left shoulder will go out of the way.
A basic forehand follow-through technique that in time can adjust to different shots
The most common mistake on the forehand follow-through is that the left arm just drops dead and the right arm ends up alone in the follow-through. Then the shoulders tend to fight each other – they’re blocking each other – so the hitting arm cannot easily swing through the ball.
When we catch the racket, then our shoulders can move freely through the shot. That helps us generate more power and move much more efficiently.
The 8 steps to a modern tennis forehand technique is a method of developing the fundamentals of the forehand which should be applicable to all recreational and junior tennis players, especially if they are struggling with the forehand.
If you are saying that it’s different than how most of the pros play, you’re right. But, be realistic in your expectations of what your current skill level is.
Consider that these are the most talented people in the world. They started very young and spent thousands of hours working on their forehand technique under the supervision of an experienced coach.
My friend Urban and I play at a very high recreational level of tennis, yet we don’t fully apply the forehand drop and flip techniques because they are extremely demanding.
Our forehands are excellent even for high level recreational play. Neither of us has any problems putting opponents under pressure from the baseline or finishing short balls when we have to.
While this article and its corresponding video above are extensive, they represent less than 10% of the instruction I provide in the full Effortless Forehand video course, which includes more than 4 hours of video instruction.
The Effortless Forehand course shows you various practical drills that help you develop the forehand techniques described above.
It teaches you how to engage your bigger muscles in the body for effortless power through drills based on biomechanics, and it teaches you all the major stances and footwork patterns that allow you to hit quality forehands from any situation.
If you have any questions or thoughts about developing the fundamental tennis forehand technique described above, just use the comments section below.
Even some of the pros play with a simpler forehand technique and yet they are one of the best. Here’s Simona Halep forehand where she drops it in a way I recommend:
And what about the junior players (boys)? Do you still recommend doing like Halep does?
I get your point regarding the amateurs, but shouldn’t be the kids taught like Rick Macci explains (as he frequently likes to mention – there is a better way..:))?
I don’t think Federer or Dimitrov or whoever drops the racket face down in the backswing were taught that.
The drop is what happens because of the relaxation and not because we do it.
I think Macci’s way of teaching is terrible because he makes players DO the part (tap the dog idea) which in fact needs to happen.
It’s the same as when some coaches teach to scratch your back on the serve backswing when in fact a drop happens because of the relaxation and not because we do it.
Trying to visually copy what the pros do is the most amateurish way of looking at how tennis strokes are developed.
I personally would always start teaching the “Halep way” or Agassi way and let the player’s forehand evolve through my encouragement of relaxing, letting go, swinging freely, “throwing” the racket into the ball and so on.
That is because “Federer way” creates wrist movement before and during the contact of the ball and unless the player has amazing timing and talent this technique will cause many more problems than it will give benefits.
Halep way creates a calm and stable wrist which results of a very consistent stroke. If the player is capable of more advanced forehands, he will find it himself.
Or do you think players play exactly like we taught them? 😉 Like they are robots or something…
As for Rick Macci, he has a couple of videos online but he is just talking and correcting.
But the only thing that matters is before & after videos of MANY players whose technique has been changed from “Halep” to “Federer” drop and where they now play with more power, consistency and accuracy. I didn’t see those…
The value of the coach is not in how much they know and how well they can talk but in how much they can teach.
And how much they can teach can only be observed through results – meaning how the players look like after and how effective and efficient their strokes are.
And you must always take into consideration the talent of players you’re looking at.
The ones in the top 100 are the top 100 most talented players of the millions attempting to get into the top 100.
They have incredible timing, hand eye coordination and ball tracking ability and it is these abilities that allow them to relax their hand while there is a ball coming towards them at 100 km / h and not because a coach told them to drop the racket with the face down.
For those considering, the biomechanics section alone of the new forehand course is well worth the price paid; frankly I’m concerned about the day someone from the tennis braintrust community (Jason, Oscar, et al) swoops him up and takes Tomaz away from providing instruction to the recreational player, his insights are so penetrating…
Love the ‘dropping the racket on the edge’ – brilliant.
For those following John Yandell or Rick Macci (great instructors too), I find Tomaz’s honesty refreshing:
“… I have played for 30 years at quite a high recreational level, yet my forehand has never evolved into that technique. As such, I have strong reservations about the pro technique used by recreational tennis players…”
And
“… But, be realistic in your expectations of what your current skill level is…”
Tomaz’s Feel Tennis has always been a place where, yes, you can play by feel – but it is also rigorously honest, practical and goal oriented for the recreational player.
Invest in Tomaz – I know I look forward to his continued instruction…!
Yes, I think the biomechanics is something almost no one is showing out there online because frankly most coaches don’t know much about it.
And yet it’s the most effective way to unlock the player’s body and have them feel power.
As for the flip / drop technique I’ve seen and worked with recreational tennis players who have tried to use it but in all cases they weren’t really able to pull it off well.
In most cases they never reached full racket lag, their swings were too short and their wrist were too tight.
That’s because it’s so difficult to time that flip to the speed of the incoming ball.
If on the other hand the player doesn’t flip the racket but just drops it with strings pointing down then he / she might still get away with it and make it work.
But yes, as I said above, I would always suggest simplicity of technique (like most WTA players play) rather than a complex movement that can potentially give you more power but is inconsistent.
I think the first time I started to appreciate this instruction from you, where I started to ‘see’ it (although I now see it better in other places/modules), was here:
I cannot believe this is free instruction; and this kid has such a nice – fast – groundstroke…
You’ve been at this a long time Tomaz; even your stuff from 5, 6 years ago interesting; you must be truly obsessed by aspects of this game; lucky for us it’s not Volleyball…!
Another great piece of advice from you, thanks! I have an eastern grip, I started playing my forehand according to your basic course instructions, turning and dropping the edge. My instructor later changed me to pull my elbow back, racquet facing the ground. Before that I had reached a fast and complex ball which I could not replicate anymore, now I know. I wonder why he did it.
Coaches can make a mistake of trying to apply pro tennis technique to a recreational tennis player. Pro technique is exactly what it says it is: it’s for pros. It’s advanced, it works only at high levels.
Pro drivers can make turns on the road by drifting the car and still control it. We can’t. 😉
So what I suggest is to use simple and yet effective forehand technique that can be used even with recreational tennis players who don’t have the time to practice daily for hours in order to hone and master high level techniques.
Tomaz, your instruction has helped me understand stroke mechanics and feel better than all other instruction combined. However, your last forehand video on dropping the rear racquet edge down and back confuses me. It does feel good but is at odds with many videos of top guys (i.e. Federer) that drop the racquet face down and to the front (after unit turn) which also feels good and a little quicker. Can you comment on the pros & cons?
My simplest answer is that you are not a pro so trying to use advanced acceleration techniques without lots of practice will simply cause you more problems than benefits.
Dropping the racket with the face down doesn’t set the wrist in a laid back position, the wrist is somewhere in between.
Then when the forward movement happens the wrist (hopefully!) falls into place JUST A SPLIT SECOND before contact.
That requires the player to be able to have a relaxed wrist just a split second before contact (which 99% of the rec players cannot because they are anxious and are muscling the ball) and also time the shot to almost perfection (which 99% of rec players cannot) because if you are slightly late then the wrist will not be in a position yet and you’ll have to tighten it to direct the ball which robs of you that very power you’re looking for with this movement.
I am suggesting what the pros do – it’s just a different technique not used by many men (Del Potro is one) but used by most women.
When you drop the racket on the edge your wrist will fall back into place early in the swing and it will be in a stable position and not moving through the stroke.
Even if you mistime the ball slightly you’ll still hit a solid shot.
And here’s a quote from one of the players who bought the Effortless Forehand course:
I’ve found that your concept of the gravity drop of the racquet head on edge to start the ‘bowling’ with extension to the target has solved my spraying balls all over the court problem. Best lesson on the web.
Love your work and as a level 1 coach spending alot of hours on court it has really helped me out and expanded my knowledge. Always learning! Is there a similar article on backhand?
As for the backhand I’ll post it in the same way as I did this one – once I complete the full course I then take out the key elements of the Technique module and add them up into one single overview article.
I plan to work on the one-handed backhand course quite soon and later in the year also complete the two-handed backhand and the backhand slice courses.
Excellent instruction Tomaz… I am just back to my tennis following surgery for a torn rotator cuff… I tried all of these suggestions yesterday & I was amazed how relaxed my hitting arm was feeling as I was quite nervous about how my shoulder would feel I have watched this video several times now…I watch it every time before I go to hit with my teacher !! I love your method of tennis teaching…
I used to watch Andre Agassi’s forehand 😉 before playing matches or just before going out to hit some balls and it helped a lot having a very clear visual “movie” of how to hit a forehand.
Eastern grip is a good grip, Roger Federer plays with it and also my friend Urban that you see in some of the videos (or in the Effortless Forehand course) and both of them can hit really good forehands from any situation. 😉
Wow! For me, this 8-step lesson (along with the gradual acceleration video link within it) is one of the best tennis teaching articles I’ve ever read!
For years, I’ve been trying to figure out why my forehand didn’t feel as natural and smooth as my backhand – and you have given me that answer. Letting the racquet head drop on edge through gravity rather than through muscle effort makes all the difference in the world.
That’s what I’ve always done with my backhand.
But, with my forehand, I have constantly been trying to force an imitated discus throwing motion around the equator of my body with a convoluted (for me) attempt to “turn the door knob” with my wrist first clockwise at the back of the swing and then counter clockwise at the end while also trying to “time” the striking of the strings on the ball in a “brushing up the back” motion.
(In other words, one very complex and impossible sequence for a recreational player.)
I can now relate, though, 120% with your simplified and clear bowling analogy because I was a high, near 200-average bowler for years – using a very natural, relaxed gravity drop style on the backward swing of the bowling ball; then letting the forward motion begin gradually to the bending and pushing up with the knees; finishing with a high, accelerated follow-through; combined with “steering” the arm swing at the spot I needed to hit to make a successful shot.
Viola! K.I.S.S. Keep it simple, stupid.
A loose and relaxed bowling form (along the lines of Earl Anthony who was one of the best bowlers ever years and years ago) was the key. And, it just makes sense that the same would work for tennis.
So, thank you very much – because with this lesson you have put the fun back into my tennis game in place of the frustration of previously trying to physically manhandle my forehand, my serve and most of my volley shots.
And I am really glad that an expert bowler 😉 can share his views here.
Yes, I believe in fundamentals that give our strokes the “stability” and therefore consistency and once we have that in place in most cases more “advanced” acceleration techniques will just evolve without any conscious thought.
No, the bowling motion feeling is straight ahead but as you initiate it it will start at a 45 degree outwards angle, exactly like it happens when someone really bowls the ball.
The person who is really bowling is in my opinion not thinking about the outward swing path because it happens naturally if he is relaxed.
What he is thinking about it swinging forward towards the target.
The second point to keep in mind is where so many amateur tennis players and also tennis coaches go wrong: you are trying to learn the final correct technique of the stroke by doing immediately everything that the stroke includes.
That is not the case in any sport that you learn.
We must learn THROUGH STAGES. We DO NOT immediately learn “correct” technique because it is TOO COMPLEX for a beginner or intermediate and it often times results in a total mess of a technique.
Rather, we teach in stages where the initial stages of stroke technique are simplified versions of the final technique.
As the player stabilizes the simpler technique – THE FUNDAMENTALS – then we proceed to more complex parts of the technique and deal with little details.
This article above is just a broad and simplified explanation of the forehand technique. These are the stroke fundamentals that will put a beginner and intermediate recreational tennis player on the right track.
Once they are more comfortable with this technique, and don’t have to think much about it, ONLY THEN we start teaching the little details of paying attention to the initial outward swing into the ball – if that doesn’t already happen naturally.
If we give all the information to the player at once they will be overwhelmed and end up thinking too much and therefore not being able to execute the stroke fluidly and at the same time pay attention to the ball.
What you don’t realize is the difference between teaching someone tennis technique and analyzing stroke technique to the minute detail.
You have probably never taught anyone stroke technique and you have no idea into what kind of disaster your student will fall into if you tell them too many things at once.
Therefore I do not share everything about the stroke in one article but I break it down in multiple articles throughout the site so that you can focus only on one detail of the stroke at a time. (except for this bigger Forehand Technique Overview article)
I am a tennis teacher and I try to teach through this site by using the principles of teaching and learning. From simple to complex, teach through stages, clear, simple and concise instructions, one thing at a time, etc.
These are the principles of teaching and by applying them we achieve the fastest progress.
The slower you teach the faster the student learns.
Analyzing tennis technique in detail and explaining what happens verbally is NOT teaching and in fact causes much more harm than good.
Hi Thomasz, very nice article as always! I’m writing to stress out a technical detail that should be taken care of. Trying to follow your instructions, I found myself having turned completely my hips and torso before my arm would start accelerating (torso looking in front and the arm behind at almost 90 degrees angle comparing wirh the torso), which I believe is not the way to go… This was caused by too much relaxness of the arm! Indeed, I believe that the arm should lag a bit, but mainly because of the relaxness of the wrist and the LOWER (below the elbow) arm, which leaves behind the weight of the racket, which at some point is pulled at front on a very short time window. But the upper arm, that is to say the shoulder muscles, should NOT COMPLETELY RELAXED and should start turning immediately with the turn of the torso. I would like to read your input on this, keep up with the good work 😉
This is not at all a complaint, but simply trying to save people from reproducing the same error as me – and of course making sure that finally I got it right.
To be precise, you didn’t say anywhere that the arm should lag that much or that we should focus on the lag, but it occurred to me simply by completely relaxing my (upper) arm while turning my hips: the arm wouldn’t move until it would be “pulled” by the torso.
This was not at all a voluntary movement, it was a consequence of relaxing my upper arm and not only my lower arm and wrist.
I only got conscious of it after a friend talked to me about it and after watching myself on video.
The high follow-through HAPPENS when we want to impart lots of topspin and we hit the ball a little bit late.
If someone is used to hitting the ball very flat all the time then this follow-through will not happen for them.
My main point is that it happens. I have never been taught or tried artificially to learn to follow-through over my head.
It just happens here and there. All I do is play the ball, I have no thoughts about my follow-throughs.
Again, the most common reason why recreational tennis players never have it happen is because they don’t even attempt to hit the ball with such amounts of topspin that I or the pros do.
So learning a high follow-through artificially won’t do you any good if you’re not accelerating as fast as I do for example.
You will force something that you saw on TV not really knowing what’s going on.
Again, in my opinion one should NOT artificially try to learn a high follow-through. It may just happen.
You should have no thoughts about technique when you play after all, you should just imagine the ball flight.
I really struggle trying to relax my mind and body because I am so so passionate about the game. I play regular leagues and am trying so so hard to get lag and all the other stuff u talk about. Every now and then I hit an amazing ball just by turning my hips more as this makes my while body lag a bit which is amazing. Any tips yo stay focused and relaxed in a match situation? I watch ur videos all the time. So so amazing. My fave was the universal swing path and the video with the ball on the rope showing the change in the sweet spot if u rotate too early. Thanks again. Rob UK. X
First of all, I’d like to thank you for your excellent lessens, they help me a lot.
I have a question concerning training against a wall. I happened to find out that when I practice new skills, it’s easier for me to play with red foam balls (stage 3 children balls) because they’re much slower and give me more time to analyze what I’m doing right or wrong.
What do you think about it? Wouldn’t my play behave differently when I play with ordinary balls?
Those are all good ideas. So yes, play with softer balls and you can also play off two bounces.
If you play with soft balls all the time, then sure, you may be a bit confused when playing a normally hard ball.
So use the soft balls as first level of progression until you can play well the element of the stroke you’re working on. Then progress to normal balls.
I wanted to share with you some recent observations I’ve made regarding technique coaching my wife and trying to get over tennis injuries.
1. Count 1, 2, 3-4. Three is racquet head going foreword and 4 is acceleration before impact.
We tend too often to pull as fast as possible from the power position racquet head low towards contact. It works with some balls but pros will compress the ball at impact by approaching the hand to the ball relatively slowly then accelerating the racquet through the point of impact, not from way back low. Federer says when he is having problems he slows down. I’m sure he means he approaches the hand more slowly to the ball before accelerating through. See: Stretch shorten cycle (SSC).
This rhythm has more than anything helped me meet the ball at the right point on contact and improved timing considerably.
2. Don’t windshield wiper balls by intentionally accelerating the racquet head upwards through contact by radially deviating briskly. The racquet head should accelerate almost horizontally through contact. This is done by an almost horizontal lag and pulling the butt of racquet handle towards the intended target horizontally. Look at the pros. Their racquet heads are inches below contact not a foot below like many coaches teach. Emphasizing a foot makes us brush up on balls which is ok but if you want to compress balls and get penetration and kick you need to think more of hitting through more horizontally (it’s relative: I’m not saying hitting flat but flatter…with the semi-western grip the racquet head naturally will move upwards giving you topspin but don’t obsess over topspin. You need pace and penetration, atleast I do!) Stand next to net and feel the resistance of the net rubbing against the racquet as you pull parallel to the net. This will give you a feel of pulling and the proper lag. I’ve been teaching this to my wife but forgot the feeling until recently.
3. Ever hear about relaxing the wrist? I’ve been told this and read about it time and time again. Others say you should tighten up 5-6” before contact!
I injured my wrist today (pulled flexor carpi ulnaris) and still had 1 hour left which made me try to hit with less effort and staying 90% relaxed instead of my maybe 50%. I tried different things. Finally, I went back to what I had noticed when I was 12yo hitting half volleys to start the practice rallies: SLAP THE BALL. Yes, just 8” before contact release the wrist and increase the angle between your forearm and the racquet. I have been religiously trying to keep this angle at 90 degrees like a total idiot until contact and releasing AFTER. Release before. Releasing after is inefficient. The ball is gone. The racquet head will accelerate quite effortlessly through the point of contact! It’s miraculous. Like a whip, you need to slow down segments of the whip to accelerate the tip. Same thing in tennis. It’s all in the sequence of acceleration and deceleration to get the racquet head accelerating through contact. Obviously don’t hit so late that you’ve completed the release by the time you hit the ball. You’ll lose too much control. The relaxed wrist will let the racquet head fly though horizontally or at a slight angle upwards and forwards and the angle between the forearm and racquet will hit 180 degrees at some point (just like IMG teaches) and if you’re really relaxed it will bend a bit beyond that in late follow through. The best way I’ve found to release is ironically to slow segmentally down your shoulder rotation then arm then hand in the right sequence and abruptness so the racquet face catches up to your wrist. This also means you need to find a contact point that’s not too far ahead. If it’s too far ahead your forearm-racquet angle will be too close to 90 and you won’t get much release nor snap.
It’s not intuitively obvious to an adult student atleast not to the ones I’ve met. You need to time slower sections of your swing then accelerate at right time, stopping or slowing segmentally shoulder rotation, arm and hands at the right moment to snap the whip (the racquet head) forward through contact.
Hi, I noticed that in your students’s examples before and after your right handed students pivot around the left leg (firmly pressed on the ground) when hitting their forehand but Roger Federer pivots around his right leg. Can please you explain this difference.
I’d like to teach my son to play tennis and l’m looking for some good instructional videos for Forehand and other techniques. This video is excellent, but i failed to explain it to my son, it’s too complicated for his age. Maybe you could recommend some tutorials/videos of how to teach a 6 year old kid different tennis techniques. I tried to teach him some things and it was very frustrating.
As a final note – teaching children tennis requires more knowledge in my view than teaching tennis pros.
One needs to know about how the brain is developing, at which age can certain motor skills be developed, how to actually develop those skills, how to make training fun with various games that incorporate those exercises and so on. It is very very difficult job to do if you want to do it right.
If the job is not done right, kids don’t improve well, don’t have fun and soon quit tennis not to mention develop a bad relationship with the coach / parent.
Only highly trained and multiple certified coaches should be working on tennis development with children.
Tomaz, I have been following your channel more than any other online coach for about 1.5 years. We’re trying to assist our daughter (age 9) to learn tennis in addition to occasional pro coaches. We, both decent tennis players, hit with her often to drill and play. Also with our son ( 7). She has quite a natural backhand.
However, her forehand persists to be disconnected from leg and hip power. It might happen occasionally, but only on accident. I’m now confident she’s arming the ball and not maintaining the torso firmness to channel any hip rotation. As an ex-swing and tango dancer myself, I equate this to maintaining “frame.” For dancing it’s essential and without which one really has no hope of dancing well. I tried focusing on non-dominant arm, but that’s not helped much.
I fear we need to rebuild her forehand. Neither of the two pros have made this diagnosis. In fact they led me to believe her forehand is right on track, no problem. Do they shy away from working on that because it’s too challenging??? I cannot believe I’ve allowed it to persist this long. I always thought with time it would just improve, but it’s not.
Sorry for the large windup. Question is this: should I put a stop to my daughter’s free rally time and forehand drills and go off court to develop the biomechanics of the hip/leg/torso relationship? What steps would you recommend considering her age and 2 years of training (one 1.5 have been very serious).
Really appreciate your teaching. I am a H.S. coach in Chimacum wa.. We are using your forehand model (as well as much more) .I have rt. handed players with dead left arms. what do you recommend?
Tomaz, thanks a lot for the FANTASTIC lessons! I practice at one of our tennis courts in Calgary every day, and I also make sure I watch your lessons on YouTube at least once every day. Please continue your teaching techniques exactly as you’ve been doing…please don’t change anything. You once mentioned that we turn the foot 45 degrees. I’ve been learning tai chi for 14 years, so this comment makes a lot of sense to me, as does the turning of the body/spine which you’ve mentioned several times.
I have the problem that my wrists are not very flexible. They don’t bend back more than about 20 degrees. For the drop technique you are demonstrating the wrist goes back close to 90.
Can I still use this technique or is there a change to it that would suit me and my wrists better?
If you’re looking at your wrist bend just at home and how much you can bend it (not really swinging a racket), then wrist won’t bend that much. I can bend it around 50 degrees or so.
But when I swing the racket the wrist will bend close to 90 degrees. So your wrist will likely bend more during the swing.
What matters is not much exact degrees but that the wrist comes to the end of its movement, so to the maximum bend position where it stabilizes.
Very helpful! After a two and half year break from my two and half year tennis life I was sorely in need of some clear reminders. Many thanks! – Audrey S
{"email":"Email address invalid","url":"Website address invalid","required":"Required field missing"}
Session expired
Please log in again. The login page will open in a new tab. After logging in you can close it and return to this page.
Manage Cookie Consent
This website uses cookies to improve your experience. We'll assume you're ok with this, but you can opt-out if you wish.
Functional Always active
The technical storage or access is strictly necessary for the legitimate purpose of enabling the use of a specific service explicitly requested by the subscriber or user, or for the sole purpose of carrying out the transmission of a communication over an electronic communications network.
Preferences
The technical storage or access is necessary for the legitimate purpose of storing preferences that are not requested by the subscriber or user.
Statistics
The technical storage or access that is used exclusively for statistical purposes.The technical storage or access that is used exclusively for anonymous statistical purposes. Without a subpoena, voluntary compliance on the part of your Internet Service Provider, or additional records from a third party, information stored or retrieved for this purpose alone cannot usually be used to identify you.
Marketing
The technical storage or access is required to create user profiles to send advertising, or to track the user on a website or across several websites for similar marketing purposes.


Excellent instruction as always. Was not aware of the need to spread the index finger.
Like your focus on practical advice for improving the game of recreational players rather than trying to mimic the pros.
Much appreciated.
Fraser Mitchell
Scotland (but not an Andy or Jamie Murray)
Thanks, Fraser.
Even some of the pros play with a simpler forehand technique and yet they are one of the best. Here’s Simona Halep forehand where she drops it in a way I recommend:
Hi, Tomaz,
And what about the junior players (boys)? Do you still recommend doing like Halep does?
I get your point regarding the amateurs, but shouldn’t be the kids taught like Rick Macci explains (as he frequently likes to mention – there is a better way..:))?
Hi Giedrius,
I don’t think Federer or Dimitrov or whoever drops the racket face down in the backswing were taught that.
The drop is what happens because of the relaxation and not because we do it.
I think Macci’s way of teaching is terrible because he makes players DO the part (tap the dog idea) which in fact needs to happen.
It’s the same as when some coaches teach to scratch your back on the serve backswing when in fact a drop happens because of the relaxation and not because we do it.
Trying to visually copy what the pros do is the most amateurish way of looking at how tennis strokes are developed.
I personally would always start teaching the “Halep way” or Agassi way and let the player’s forehand evolve through my encouragement of relaxing, letting go, swinging freely, “throwing” the racket into the ball and so on.
https://www.staging.feeltennis.net/power-and-control/
That is because “Federer way” creates wrist movement before and during the contact of the ball and unless the player has amazing timing and talent this technique will cause many more problems than it will give benefits.
Halep way creates a calm and stable wrist which results of a very consistent stroke. If the player is capable of more advanced forehands, he will find it himself.
Or do you think players play exactly like we taught them? 😉 Like they are robots or something…
As for Rick Macci, he has a couple of videos online but he is just talking and correcting.
But the only thing that matters is before & after videos of MANY players whose technique has been changed from “Halep” to “Federer” drop and where they now play with more power, consistency and accuracy. I didn’t see those…
The value of the coach is not in how much they know and how well they can talk but in how much they can teach.
And how much they can teach can only be observed through results – meaning how the players look like after and how effective and efficient their strokes are.
And you must always take into consideration the talent of players you’re looking at.
The ones in the top 100 are the top 100 most talented players of the millions attempting to get into the top 100.
They have incredible timing, hand eye coordination and ball tracking ability and it is these abilities that allow them to relax their hand while there is a ball coming towards them at 100 km / h and not because a coach told them to drop the racket with the face down.
great instuction
Superb bio mechanical guide for executing the forehand stroke. Both the video and the written instructions are awesome.
Keep up the good work.
Thank you
Bakthan Savarirayan,M.D
Anaheim,California
Thanks for the feedback, Bakthan, and keep in touch!
Bravo, again Tomaz – and thank you.
For those considering, the biomechanics section alone of the new forehand course is well worth the price paid; frankly I’m concerned about the day someone from the tennis braintrust community (Jason, Oscar, et al) swoops him up and takes Tomaz away from providing instruction to the recreational player, his insights are so penetrating…
Love the ‘dropping the racket on the edge’ – brilliant.
For those following John Yandell or Rick Macci (great instructors too), I find Tomaz’s honesty refreshing:
“… I have played for 30 years at quite a high recreational level, yet my forehand has never evolved into that technique. As such, I have strong reservations about the pro technique used by recreational tennis players…”
And
“… But, be realistic in your expectations of what your current skill level is…”
Tomaz’s Feel Tennis has always been a place where, yes, you can play by feel – but it is also rigorously honest, practical and goal oriented for the recreational player.
Invest in Tomaz – I know I look forward to his continued instruction…!
Thank you very much for this kind feedback, Ken.
Yes, I think the biomechanics is something almost no one is showing out there online because frankly most coaches don’t know much about it.
And yet it’s the most effective way to unlock the player’s body and have them feel power.
As for the flip / drop technique I’ve seen and worked with recreational tennis players who have tried to use it but in all cases they weren’t really able to pull it off well.
In most cases they never reached full racket lag, their swings were too short and their wrist were too tight.
That’s because it’s so difficult to time that flip to the speed of the incoming ball.
If on the other hand the player doesn’t flip the racket but just drops it with strings pointing down then he / she might still get away with it and make it work.
But yes, as I said above, I would always suggest simplicity of technique (like most WTA players play) rather than a complex movement that can potentially give you more power but is inconsistent.
I think the first time I started to appreciate this instruction from you, where I started to ‘see’ it (although I now see it better in other places/modules), was here:
https://www.staging.feeltennis.net/tennis-forehand-contact-point/
I cannot believe this is free instruction; and this kid has such a nice – fast – groundstroke…
You’ve been at this a long time Tomaz; even your stuff from 5, 6 years ago interesting; you must be truly obsessed by aspects of this game; lucky for us it’s not Volleyball…!
Thanks, Ken. Yeah, lots of little details have to come together for a higher level tennis game.
And only the obsessed ones find them. 😉
Hi Tomaz,
I am recreational player, started late and now playing for 7,8 years. All that time with eastern grip.
What would be the advantage of semi-western over eastern grip?
Does it make sense for me change the grip at this stage of my “career”?
Thanks and regards
Hi Simun,
Eastern grip is just fine, Federer, Del Potro and my friend Urban play with it and they all have great forehands. 😉
Semi-western is easier for dealing with higher balls around shoulder and makes it a bit easier to impart topspin.
And no, it’s doesn’t really make sense to change a grip at this stage. As I said even the top pros can use it and it’s a very stable grip.
Hi Tomaz,
Another great piece of advice from you, thanks! I have an eastern grip, I started playing my forehand according to your basic course instructions, turning and dropping the edge. My instructor later changed me to pull my elbow back, racquet facing the ground. Before that I had reached a fast and complex ball which I could not replicate anymore, now I know. I wonder why he did it.
Hi Luca,
Coaches can make a mistake of trying to apply pro tennis technique to a recreational tennis player. Pro technique is exactly what it says it is: it’s for pros. It’s advanced, it works only at high levels.
Pro drivers can make turns on the road by drifting the car and still control it. We can’t. 😉
So what I suggest is to use simple and yet effective forehand technique that can be used even with recreational tennis players who don’t have the time to practice daily for hours in order to hone and master high level techniques.
Tomaz, your instruction has helped me understand stroke mechanics and feel better than all other instruction combined. However, your last forehand video on dropping the rear racquet edge down and back confuses me. It does feel good but is at odds with many videos of top guys (i.e. Federer) that drop the racquet face down and to the front (after unit turn) which also feels good and a little quicker. Can you comment on the pros & cons?
Hi Adrian,
My simplest answer is that you are not a pro so trying to use advanced acceleration techniques without lots of practice will simply cause you more problems than benefits.
Dropping the racket with the face down doesn’t set the wrist in a laid back position, the wrist is somewhere in between.
Then when the forward movement happens the wrist (hopefully!) falls into place JUST A SPLIT SECOND before contact.
That requires the player to be able to have a relaxed wrist just a split second before contact (which 99% of the rec players cannot because they are anxious and are muscling the ball) and also time the shot to almost perfection (which 99% of rec players cannot) because if you are slightly late then the wrist will not be in a position yet and you’ll have to tighten it to direct the ball which robs of you that very power you’re looking for with this movement.
I am suggesting what the pros do – it’s just a different technique not used by many men (Del Potro is one) but used by most women.
When you drop the racket on the edge your wrist will fall back into place early in the swing and it will be in a stable position and not moving through the stroke.
Even if you mistime the ball slightly you’ll still hit a solid shot.
And here’s a quote from one of the players who bought the Effortless Forehand course:
Hi Tomaz,
Love your work and as a level 1 coach spending alot of hours on court it has really helped me out and expanded my knowledge. Always learning!
Is there a similar article on backhand?
Regards,
Alec
Thanks, Alec!
As for the backhand I’ll post it in the same way as I did this one – once I complete the full course I then take out the key elements of the Technique module and add them up into one single overview article.
I plan to work on the one-handed backhand course quite soon and later in the year also complete the two-handed backhand and the backhand slice courses.
So stay tuned!
Hello Tomas:
Great website. The forehand drop helped me time my shots for accuracy and consistency.
Please please let us know when the two-handed backhand video is available.
Thanks from Calgary, Canada.
Thanks, Pablo!
The two-handed backhand video course is in the works already. Keep in touch through my newsletter.
Excellent instruction Tomaz…
I am just back to my tennis following surgery for a torn rotator cuff…
I tried all of these suggestions yesterday & I was amazed how relaxed my hitting arm was feeling as I was quite nervous about how my shoulder would feel
I have watched this video several times now…I watch it every time before I go to hit with my teacher !!
I love your method of tennis teaching…
Many Thanks,
Anne
Glad that it helped, Anne.
I used to watch Andre Agassi’s forehand 😉 before playing matches or just before going out to hit some balls and it helped a lot having a very clear visual “movie” of how to hit a forehand.
Hi Tomaz,
about the grip, to make it very clear:
When using so far the eastern forehand grip, now I have to change to the semi-western grip.
Regards from Munich
Dieter
Hi Dieter,
Eastern grip is a good grip, Roger Federer plays with it and also my friend Urban that you see in some of the videos (or in the Effortless Forehand course) and both of them can hit really good forehands from any situation. 😉
So no need to change…
Tomaz,
Wow! For me, this 8-step lesson (along with the gradual acceleration video link within it) is one of the best tennis teaching articles I’ve ever read!
For years, I’ve been trying to figure out why my forehand didn’t feel as natural and smooth as my backhand – and you have given me that answer. Letting the racquet head drop on edge through gravity rather than through muscle effort makes all the difference in the world.
That’s what I’ve always done with my backhand.
But, with my forehand, I have constantly been trying to force an imitated discus throwing motion around the equator of my body with a convoluted (for me) attempt to “turn the door knob” with my wrist first clockwise at the back of the swing and then counter clockwise at the end while also trying to “time” the striking of the strings on the ball in a “brushing up the back” motion.
(In other words, one very complex and impossible sequence for a recreational player.)
I can now relate, though, 120% with your simplified and clear bowling analogy because I was a high, near 200-average bowler for years – using a very natural, relaxed gravity drop style on the backward swing of the bowling ball; then letting the forward motion begin gradually to the bending and pushing up with the knees; finishing with a high, accelerated follow-through; combined with “steering” the arm swing at the spot I needed to hit to make a successful shot.
Viola! K.I.S.S. Keep it simple, stupid.
A loose and relaxed bowling form (along the lines of Earl Anthony who was one of the best bowlers ever years and years ago) was the key. And, it just makes sense that the same would work for tennis.
So, thank you very much – because with this lesson you have put the fun back into my tennis game in place of the frustration of previously trying to physically manhandle my forehand, my serve and most of my volley shots.
Bob
Thank you very much for your feedback, Bob.
And I am really glad that an expert bowler 😉 can share his views here.
Yes, I believe in fundamentals that give our strokes the “stability” and therefore consistency and once we have that in place in most cases more “advanced” acceleration techniques will just evolve without any conscious thought.
If I consider your video “How to hit a clean shot” mustn’t I do the bowling motion in a 45 degree angle (roughly) instead of straight towards the net?
And if I turn around the correct axis mustn’t this also happen at a point somewhere 45 degree (at the side) and not in front?
As the camera is placed here right in front it seems as if you recommend this direction.
Hi Andreas,
No, the bowling motion feeling is straight ahead but as you initiate it it will start at a 45 degree outwards angle, exactly like it happens when someone really bowls the ball.
The person who is really bowling is in my opinion not thinking about the outward swing path because it happens naturally if he is relaxed.
What he is thinking about it swinging forward towards the target.
The second point to keep in mind is where so many amateur tennis players and also tennis coaches go wrong: you are trying to learn the final correct technique of the stroke by doing immediately everything that the stroke includes.
That is not the case in any sport that you learn.
We must learn THROUGH STAGES. We DO NOT immediately learn “correct” technique because it is TOO COMPLEX for a beginner or intermediate and it often times results in a total mess of a technique.
Rather, we teach in stages where the initial stages of stroke technique are simplified versions of the final technique.
As the player stabilizes the simpler technique – THE FUNDAMENTALS – then we proceed to more complex parts of the technique and deal with little details.
This article above is just a broad and simplified explanation of the forehand technique. These are the stroke fundamentals that will put a beginner and intermediate recreational tennis player on the right track.
Once they are more comfortable with this technique, and don’t have to think much about it, ONLY THEN we start teaching the little details of paying attention to the initial outward swing into the ball – if that doesn’t already happen naturally.
If we give all the information to the player at once they will be overwhelmed and end up thinking too much and therefore not being able to execute the stroke fluidly and at the same time pay attention to the ball.
What you don’t realize is the difference between teaching someone tennis technique and analyzing stroke technique to the minute detail.
You have probably never taught anyone stroke technique and you have no idea into what kind of disaster your student will fall into if you tell them too many things at once.
Therefore I do not share everything about the stroke in one article but I break it down in multiple articles throughout the site so that you can focus only on one detail of the stroke at a time. (except for this bigger Forehand Technique Overview article)
I am a tennis teacher and I try to teach through this site by using the principles of teaching and learning. From simple to complex, teach through stages, clear, simple and concise instructions, one thing at a time, etc.
These are the principles of teaching and by applying them we achieve the fastest progress.
Analyzing tennis technique in detail and explaining what happens verbally is NOT teaching and in fact causes much more harm than good.
Hi Thomasz, very nice article as always!
I’m writing to stress out a technical detail that should be taken care of.
Trying to follow your instructions, I found myself having turned completely my hips and torso before my arm would start accelerating (torso looking in front and the arm behind at almost 90 degrees angle comparing wirh the torso), which I believe is not the way to go…
This was caused by too much relaxness of the arm!
Indeed, I believe that the arm should lag a bit, but mainly because of the relaxness of the wrist and the LOWER (below the elbow) arm, which leaves behind the weight of the racket, which at some point is pulled at front on a very short time window.
But the upper arm, that is to say the shoulder muscles, should NOT COMPLETELY RELAXED and should start turning immediately with the turn of the torso.
I would like to read your input on this, keep up with the good work 😉
Hi Dionysis,
It should be as you say. Where in my instruction above do I say that the arm should lag completely (90 degrees) behind the body?
I say “In this fundamental phase, I don’t recommend you focus on lagging the arm much.”
This is not at all a complaint, but simply trying to save people from reproducing the same error as me – and of course making sure that finally I got it right.
To be precise, you didn’t say anywhere that the arm should lag that much or that we should focus on the lag, but it occurred to me simply by completely relaxing my (upper) arm while turning my hips: the arm wouldn’t move until it would be “pulled” by the torso.
This was not at all a voluntary movement, it was a consequence of relaxing my upper arm and not only my lower arm and wrist.
I only got conscious of it after a friend talked to me about it and after watching myself on video.
Cheers
Hi Tomaž,
Thank you for your instruction. It has really helped my game.
I’ve frequently observed pros following through their forehands shots with their arms going over their heads.
Would you be able to explain why and how they perform this shot?
Thank you.
Hi Tom,
The high follow-through HAPPENS when we want to impart lots of topspin and we hit the ball a little bit late.
If someone is used to hitting the ball very flat all the time then this follow-through will not happen for them.
My main point is that it happens. I have never been taught or tried artificially to learn to follow-through over my head.
It just happens here and there. All I do is play the ball, I have no thoughts about my follow-throughs.
Again, the most common reason why recreational tennis players never have it happen is because they don’t even attempt to hit the ball with such amounts of topspin that I or the pros do.
So learning a high follow-through artificially won’t do you any good if you’re not accelerating as fast as I do for example.
You will force something that you saw on TV not really knowing what’s going on.
Again, in my opinion one should NOT artificially try to learn a high follow-through. It may just happen.
You should have no thoughts about technique when you play after all, you should just imagine the ball flight.
https://www.staging.feeltennis.net/intention/
Hi Tomaz,
I really struggle trying to relax my mind and body because I am so so passionate about the game. I play regular leagues and am trying so so hard to get lag and all the other stuff u talk about. Every now and then I hit an amazing ball just by turning my hips more as this makes my while body lag a bit which is amazing. Any tips yo stay focused and relaxed in a match situation? I watch ur videos all the time. So so amazing. My fave was the universal swing path and the video with the ball on the rope showing the change in the sweet spot if u rotate too early. Thanks again. Rob UK. X
Hi Rob,
Do not think about technique while you play a match, it won’t work.
It’s not a problem you have, it’s a problem for everyone and it cannot be solved.
It is not possible to work on technical elements while you compete. So don’t even try any more.
Just play the match and work on technique in a separate sessions.
To stay focused in the match you must have a plan. You must focus on executing a plan rather than trying to win points.
A plan can be to move your opponent left-right, or to play to their weaker side, or to keep the ball deep, etc.
Hello Rob!
i have the same problem, I am obsessed with technique during the competition and it does not help at all. 🙂
Hi Tomaz,
First of all, I’d like to thank you for your excellent lessens, they help me a lot.
I have a question concerning training against a wall. I happened to find out that when I practice new skills, it’s easier for me to play with red foam balls (stage 3 children balls) because they’re much slower and give me more time to analyze what I’m doing right or wrong.
What do you think about it? Wouldn’t my play behave differently when I play with ordinary balls?
Thank you,
Guy
Hi Guy,
Those are all good ideas. So yes, play with softer balls and you can also play off two bounces.
If you play with soft balls all the time, then sure, you may be a bit confused when playing a normally hard ball.
So use the soft balls as first level of progression until you can play well the element of the stroke you’re working on. Then progress to normal balls.
Completely professional analysis and insight into fundamental dynamics. Clearly and accurately.
Sincere thanks. Be always healthy and vital athletes!
I wanted to share with you some recent observations I’ve made regarding technique coaching my wife and trying to get over tennis injuries.
1. Count 1, 2, 3-4. Three is racquet head going foreword and 4 is acceleration before impact.
We tend too often to pull as fast as possible from the power position racquet head low towards contact. It works with some balls but pros will compress the ball at impact by approaching the hand to the ball relatively slowly then accelerating the racquet through the point of impact, not from way back low. Federer says when he is having problems he slows down. I’m sure he means he approaches the hand more slowly to the ball before accelerating through. See: Stretch shorten cycle (SSC).
This rhythm has more than anything helped me meet the ball at the right point on contact and improved timing considerably.
2. Don’t windshield wiper balls by intentionally accelerating the racquet head upwards through contact by radially deviating briskly. The racquet head should accelerate almost horizontally through contact. This is done by an almost horizontal lag and pulling the butt of racquet handle towards the intended target horizontally. Look at the pros. Their racquet heads are inches below contact not a foot below like many coaches teach. Emphasizing a foot makes us brush up on balls which is ok but if you want to compress balls and get penetration and kick you need to think more of hitting through more horizontally (it’s relative: I’m not saying hitting flat but flatter…with the semi-western grip the racquet head naturally will move upwards giving you topspin but don’t obsess over topspin. You need pace and penetration, atleast I do!) Stand next to net and feel the resistance of the net rubbing against the racquet as you pull parallel to the net. This will give you a feel of pulling and the proper lag. I’ve been teaching this to my wife but forgot the feeling until recently.
3. Ever hear about relaxing the wrist? I’ve been told this and read about it time and time again. Others say you should tighten up 5-6” before contact!
I injured my wrist today (pulled flexor carpi ulnaris) and still had 1 hour left which made me try to hit with less effort and staying 90% relaxed instead of my maybe 50%. I tried different things. Finally, I went back to what I had noticed when I was 12yo hitting half volleys to start the practice rallies: SLAP THE BALL. Yes, just 8” before contact release the wrist and increase the angle between your forearm and the racquet. I have been religiously trying to keep this angle at 90 degrees like a total idiot until contact and releasing AFTER. Release before. Releasing after is inefficient. The ball is gone. The racquet head will accelerate quite effortlessly through the point of contact! It’s miraculous. Like a whip, you need to slow down segments of the whip to accelerate the tip. Same thing in tennis. It’s all in the sequence of acceleration and deceleration to get the racquet head accelerating through contact. Obviously don’t hit so late that you’ve completed the release by the time you hit the ball. You’ll lose too much control. The relaxed wrist will let the racquet head fly though horizontally or at a slight angle upwards and forwards and the angle between the forearm and racquet will hit 180 degrees at some point (just like IMG teaches) and if you’re really relaxed it will bend a bit beyond that in late follow through. The best way I’ve found to release is ironically to slow segmentally down your shoulder rotation then arm then hand in the right sequence and abruptness so the racquet face catches up to your wrist. This also means you need to find a contact point that’s not too far ahead. If it’s too far ahead your forearm-racquet angle will be too close to 90 and you won’t get much release nor snap.
It’s not intuitively obvious to an adult student atleast not to the ones I’ve met. You need to time slower sections of your swing then accelerate at right time, stopping or slowing segmentally shoulder rotation, arm and hands at the right moment to snap the whip (the racquet head) forward through contact.
Hi, I noticed that in your students’s examples before and after your right handed students pivot around the left leg (firmly pressed on the ground) when hitting their forehand but Roger Federer pivots around his right leg. Can please you explain this difference.
Hi Tomaz,
I’d like to teach my son to play tennis and l’m looking for some good instructional videos for Forehand and other techniques. This video is excellent, but i failed to explain it to my son, it’s too complicated for his age.
Maybe you could recommend some tutorials/videos of how to teach a 6 year old kid different tennis techniques. I tried to teach him some things and it was very frustrating.
Thank you,
Guy
Hi Guy,
Small children do not have good enough coordination yet to actually put together complex movements like tennis strokes.
It is impossible for them to do so.
They need just some simple basic movements and then we develop them into more complex over the years.
What matters most in young age is development of motor skills.
I recommend you follow Jacques Youtube channel with lots of coordination and other drills:
https://www.youtube.com/channel/UCwj1nGKqEnXOj9O4J5z194A
Here’s another video on junior development under 9:
https://www.youtube.com/watch?v=Yk3uKltVI7Q
As a final note – teaching children tennis requires more knowledge in my view than teaching tennis pros.
One needs to know about how the brain is developing, at which age can certain motor skills be developed, how to actually develop those skills, how to make training fun with various games that incorporate those exercises and so on. It is very very difficult job to do if you want to do it right.
If the job is not done right, kids don’t improve well, don’t have fun and soon quit tennis not to mention develop a bad relationship with the coach / parent.
Only highly trained and multiple certified coaches should be working on tennis development with children.
Tomaz, I have been following your channel more than any other online coach for about 1.5 years. We’re trying to assist our daughter (age 9) to learn tennis in addition to occasional pro coaches. We, both decent tennis players, hit with her often to drill and play. Also with our son ( 7). She has quite a natural backhand.
However, her forehand persists to be disconnected from leg and hip power. It might happen occasionally, but only on accident. I’m now confident she’s arming the ball and not maintaining the torso firmness to channel any hip rotation. As an ex-swing and tango dancer myself, I equate this to maintaining “frame.” For dancing it’s essential and without which one really has no hope of dancing well. I tried focusing on non-dominant arm, but that’s not helped much.
I fear we need to rebuild her forehand. Neither of the two pros have made this diagnosis. In fact they led me to believe her forehand is right on track, no problem. Do they shy away from working on that because it’s too challenging??? I cannot believe I’ve allowed it to persist this long. I always thought with time it would just improve, but it’s not.
Sorry for the large windup. Question is this: should I put a stop to my daughter’s free rally time and forehand drills and go off court to develop the biomechanics of the hip/leg/torso relationship? What steps would you recommend considering her age and 2 years of training (one 1.5 have been very serious).
Really appreciate your teaching. I am a H.S. coach in Chimacum wa.. We are using your forehand model (as well as much more) .I have rt. handed players with dead left arms. what do you recommend?
Hi Gene,
I use elastic bands that they need to pull as they hit a forehand, I show such drills in my Effortless Forehand course.
You can also ask them to “push away” or have them hold a 0.5 kg ball or a 0.5l bottle of water in that off hand so that they activate it.
Tomaz, thanks a lot for the FANTASTIC lessons! I practice at one of our tennis courts in Calgary every day, and I also make sure I watch your lessons on YouTube at least once every day. Please continue your teaching techniques exactly as you’ve been doing…please don’t change anything. You once mentioned that we turn the foot 45 degrees. I’ve been learning tai chi for 14 years, so this comment makes a lot of sense to me, as does the turning of the body/spine which you’ve mentioned several times.
Thanks for the nice feedback, Robert!
Great to hear tennis technique and natural movements of tai chi have things in common.
Hi Tomaz
I have the problem that my wrists are not very flexible. They don’t bend back more than about 20 degrees. For the drop technique you are demonstrating the wrist goes back close to 90.
Can I still use this technique or is there a change to it that would suit me and my wrists better?
Thanks for your great videos and advice!
Dale
Hi Dale,
If you’re looking at your wrist bend just at home and how much you can bend it (not really swinging a racket), then wrist won’t bend that much. I can bend it around 50 degrees or so.
But when I swing the racket the wrist will bend close to 90 degrees. So your wrist will likely bend more during the swing.
What matters is not much exact degrees but that the wrist comes to the end of its movement, so to the maximum bend position where it stabilizes.
Thank you for sharing your videos, it’s very helpful for me, now I’m a tennis coach, I’m from Vietnam. Thank you very much.
Very helpful! After a two and half year break from my two and half year tennis life I was sorely in need of some clear reminders. Many thanks! – Audrey S