When you own a tennis ball machine like the Slinger Bag or any other type, you can do various types of drills with it.
This video article focuses on working on tennis technique with a tennis ball machine. That’s the main purpose of using a ball machine because it allows you to put in a lot of repetitions in order to groove in the new technique.
You can also use a tennis ball machine to get a good workout, to practice various shot combinations, to become more accurate with a specific shot, to improve the consistency of your strokes and so on.
Since you are likely working on improving some technical flaw of your strokes and you own a Slinger Bag or another type of tennis ball machine, I’ll show you how to progressively increase the difficulty while you work on improving your stroke technique.
The Process Of Correcting Technical Flaws Of Tennis Strokes
You will understand the progressions in this video article better if you are really clear on the process of correcting tennis stroke technique.
There are 4 stages of learning a new motor skill regardless of the sport. I’ve described these 4 stages in more detail before, so just follow the link to learn more.
You are most likely in the Conscious Competence stage if you plan to work on your technique with a tennis ball machine.
In the Conscious Competence stage, you can execute the stroke correctly if you think about it, but if you were to play a match and focus on tactics, your technique would revert back to old habit.
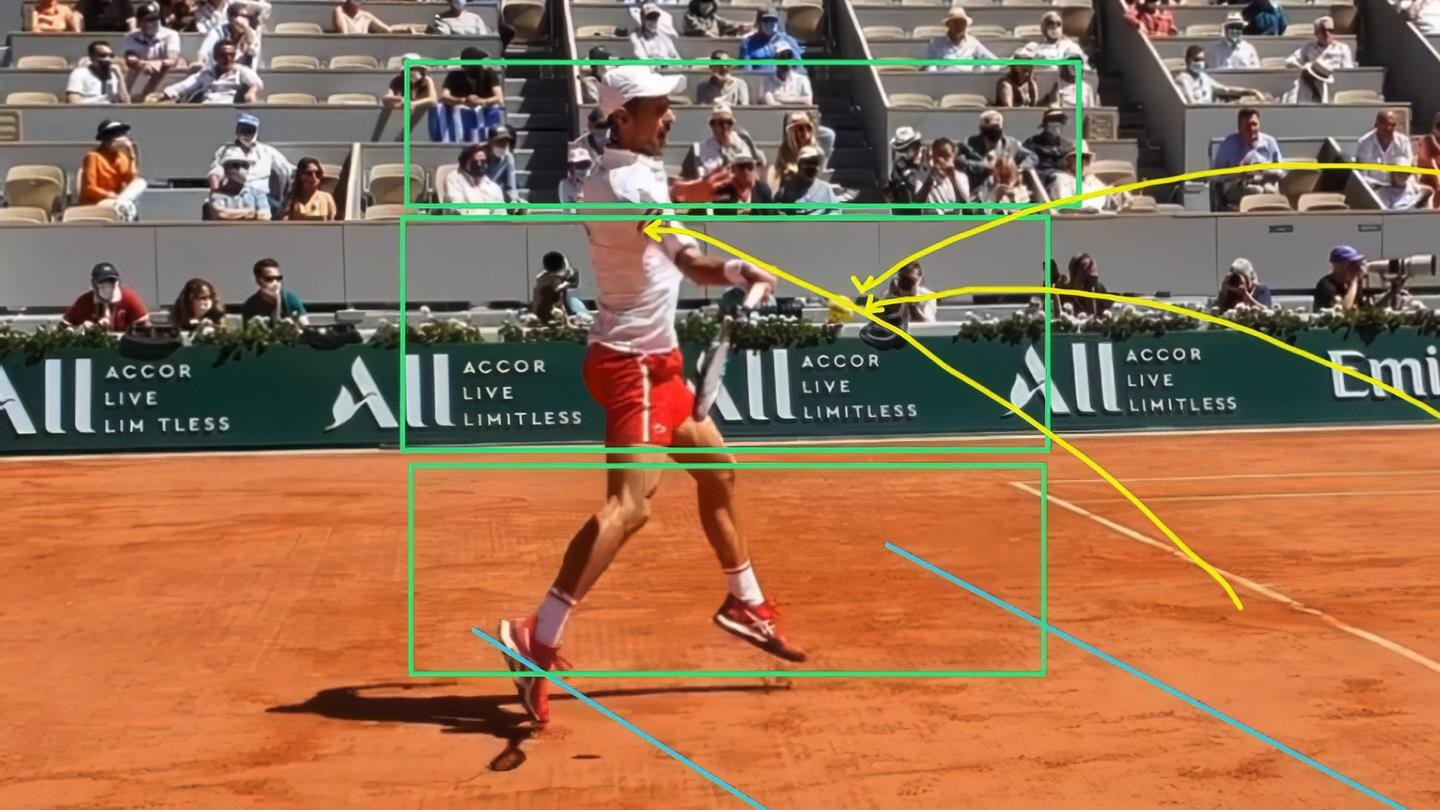
Let’s use an example of correcting the position of the non-dominant arm on the forehand side which incorrectly dangles down while you’re hitting a forehand.

If the non-dominant arm is dangling down at contact your forehand will not be consistent.
You may have had a lesson with your tennis coach who instructed you to extend your left arm (for right-handers) across in the preparation phase and catch the racket in the follow-through phase.

The non-dominant arm needs to stretch across in preparation phase. It stabilizes the shoulders.
If you think about it, you can do it correctly, but your left arm is not positioned correctly when you play a match.
That means you are in the Conscious Competence phase, and your goal is to get to the Unconscious Competence phase, where your arm will be positioned correctly even when you don’t think about it.
And how do we get from Conscious Competence to Unconscious Competence?
With lots of repetitions.
In my experience, you may need at least 2000 to 5000 repetitions—and in some cases even more, if the old incorrect movement has been ingrained for many years.
And that’s where a tennis ball machine like the Slinger Bag comes in as it provides you with consistent incoming balls that allow you to put in a lot of repetitions.
You should aim for around 200–300 repetitions per session for a certain technical flaw you want to correct, which means you’ll need 10–20 sessions like that to reach 2000–5000 repetitions in total.
I would recommend a minimum of 2 sessions per week, but ideally you should have 3–4 per week.
If you play matches during these sessions, you will prolong the period of correcting the technique significantly and even run the risk of never correcting the technique because you constantly reinforce the old technique during matches.
Why is it important to receive “nice” balls from a ball machine or from a tennis coach feeding balls from a basket?
When you focus on the position of your left arm across while receiving a ball, your attention will be split between focusing on the arm and judging the ball flight.
In most cases, the player will put more than 50% of their attention on the body movements, which will leave them with less than 50% of the “CPU power” of their brain to track the ball in flight.
And that’s NOT ENOUGH to judge the ball well!
That’s why the incoming balls must not be difficult to judge and must not constantly change in speed, height, depth and spin—which you would typically receive in a match or rallying with a lower level tennis player who doesn’t have good ball control.

I often hand feed the ball when I see the player fully focused on executing a new movement.
If you do receive such different incoming balls and you focus on technique, you will misjudge the ball and hit it late, too close or too far from your body and often times mishit the sweet spot. That’s why you’ll make mistakes.
And making a lot of mistakes while working on your technique will give you very bad feedback and the new technique will likely not “stick” in your memory.
Tennis coaches know that, and that’s why we feed balls from a basket or sometimes even throw them so that the player doesn’t have to put much mental effort into ball judgment but can devote most of their attention to correct technique and stack a lot of repetitions in one tennis session.
Once the player is able to correctly execute a new movement in easy conditions, we gradually increase the difficulty of the situation while monitoring whether the player is still able to execute the technique correctly.
The following tennis ball machine drills start with easy conditions where there is no movement and where you simply repeat the desired technique a certain number of times.
After that, we’ll add changes of direction, movement and lastly timing to increase the challenge.
I will also mention the settings and positioning of the Slinger Bag ball machine for working on volleys and overheads.
Stage 1: Stroke Repetition With No Movement And No Change Of Direction
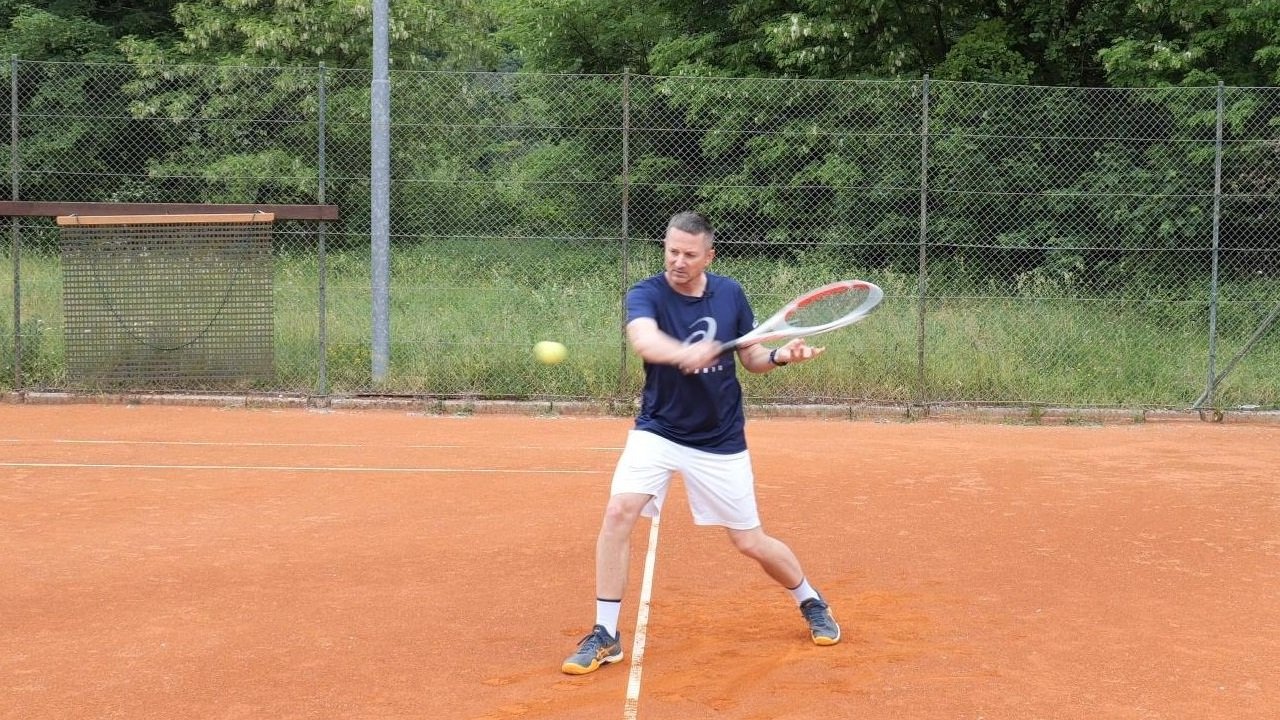
a) Working on groundstrokes
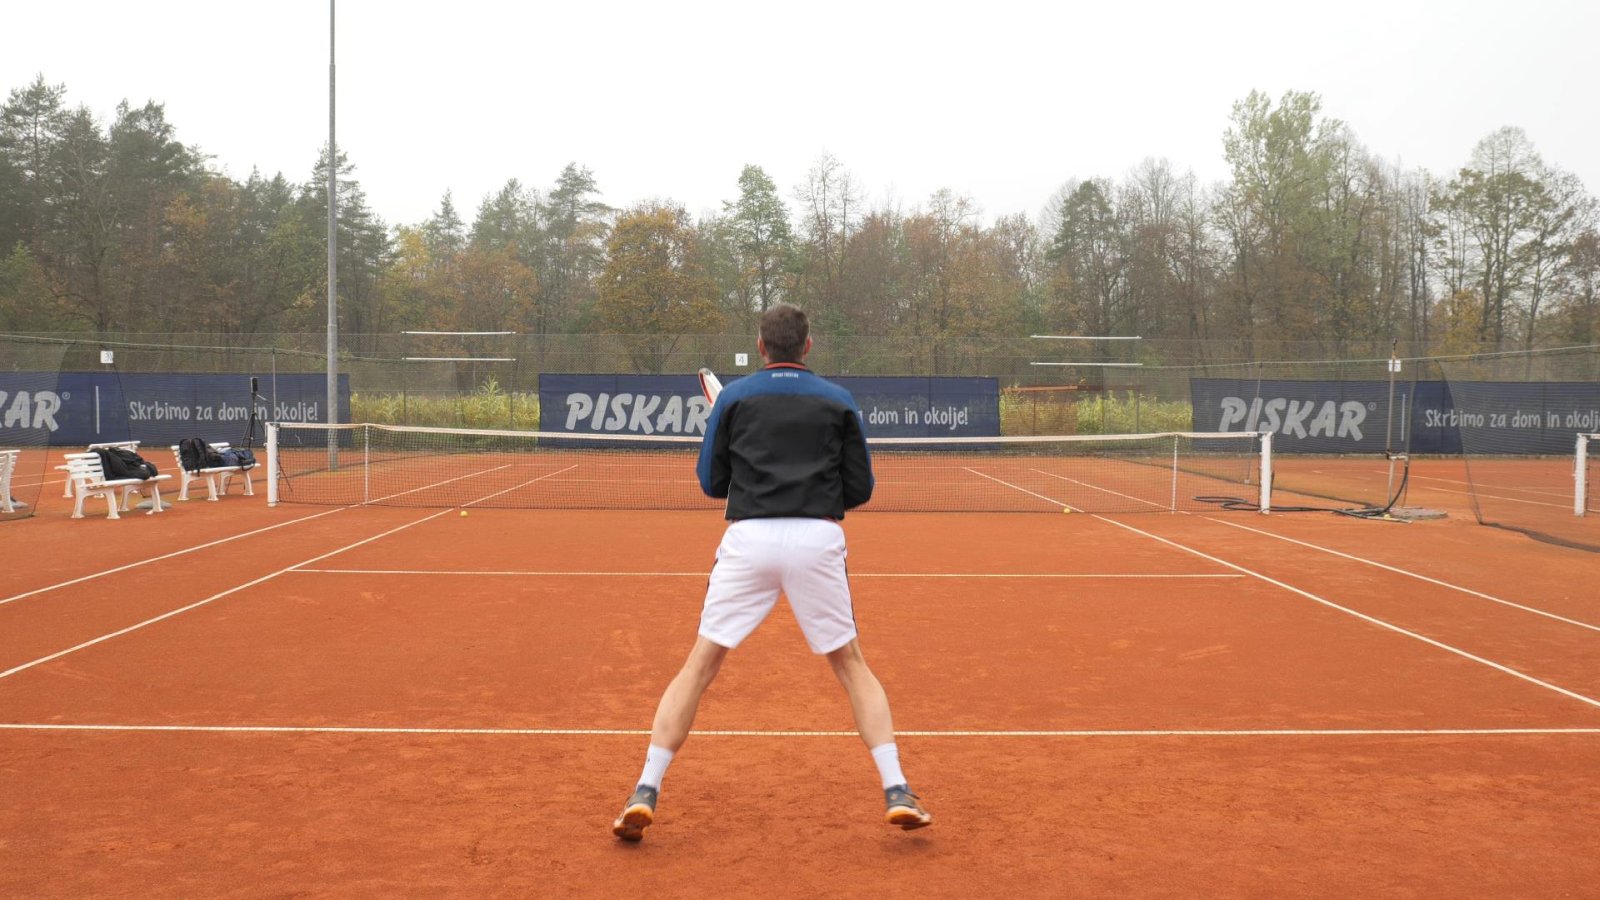
If you’re using a Slinger Bag, note the positioning of it and the settings I use, which you can see in the images below.

These are the typical Slinger Bag settings for receiving nice balls with not too much pace and topspin.
Find the right distance from the ball machine so that you’re receiving the ball comfortably between knee and waist height and work on your stroke technique.

The Slinger bag is positioned around the T area.
Make sure there is enough time delay between feeds so that you can calmly check the positioning and movement of your left arm after the stroke.
I suggest you do sets of 30–50 repetitions in a row, take a 30-second pause and continue until you reach 200–300 repetitions.
Then consider working on another stroke.
b) Working on volleys and overheads
You can use exactly the same settings on the Slinger Bag tennis ball machine to work on your volleys.

Keep the Slinger Bag ball machine at the same place and approach the net to work on volleys.
The ball out of the ball machine is just right for comfortable volleys played just inside the service box.
If you want to work on overheads, simply change the angle setting of the Slinger Bag to the maximum angle.

You can easily practice overheads from the same placement of the Slinger Bag.
Place the Slinger Bag in the middle of the court around the T of the service line, and you’ll be receiving nice lobs on which you can practice your overheads.
Stage 2: Stroke Repetition With Change Of Direction
The next level of difficulty working on your technique would be to add changes of direction.
That includes you changing the direction of the incoming ball as well as receiving the balls from both cross court and down the line directions.
Position the Slinger Bag about a meter off the center line, still somewhat close to the service line so that it also serves as a marker or a larger area down the line where you aim.

This is still work on technique, we’re just adding extra mental challenge.
Start with receiving the balls from a down-the-line feed and alternate hitting shots, one down the line and one cross court.
After a while, move the Slinger Bag next to the sideline so that it’s feeding you the ball cross court.
You may have to adjust the speed and height settings a little bit so that the incoming ball comes into your ideal strike zone from the cross court direction.

In real matches you'll receive many more balls from a cross court direction than a down the line.
Again alternate hitting cross court and down the line while you still pay attention to your technique.
You may be hitting a bit off center when hitting down the line off this cross court shot.
If that’s the case, then stop alternating but simply keep hitting down the line until you find the right adjustment needed in your positioning or timing so that you can hit the ball consistently clean in the sweet spot.
If you work on volleys, make sure you also practice this combination, namely hitting a down-the-line volley from an incoming cross court ball.

These are tricky volleys, make sure you practice them.
It’s the most challenging volley situation since the incoming ball wants to bounce off your racket at the same outgoing angle, which means it’s difficult to hit it straight down the line.
So keep practicing and adjusting until you reach a good level of ball control.
Stage 3: Stroke Repetition With Movement
If you see that you’re able to think about your technique and execute it correctly while changing direction as described above, then add another level of difficulty: movement.
I suggest you work on 3 footwork patterns on the forehand and 2 on the backhand before you move on to more complex footwork combinations.
On both the forehand and the backhand side, work on a 1-2-3 pattern into a neutral stance and a 1-2 pattern into an open stance as shown in the video above.

You can drill various stances over and over again until you do them effortlessly.
Then you can also add the 1-2 forehand open stance combination when moving around your backhand to hit your forehand.
These are the most common footwork patterns that happen in the game of tennis, and it’s important that you execute all of them smoothly, quickly and in good balance.
Remember that your primary goal is still correct stroke technique.
As such, your main attention is to execute the stroke correctly while adding the challenge of moving to the ball in a specific footwork pattern.
If you’re consistent with your technique while moving around, then also add the change of direction like suggested in Stage 2.
Stage 4: Stroke Repetition With Different Timings
The most challenging way of working on your stroke technique is to also work on different timings of the contact with the ball.
We can hit the ball when it’s on the way down, when it’s on top of the bounce or when it’s rising.
You can keep the same settings and positioning of the Slinger Bag as in previous stages.
Start by hitting the ball when it’s on the way down. We first want to feel a lot of time without being rushed or even late when hitting our strokes.

Get used to having a lot of time. It will relax your stroke.
I know from experience that many recreational tennis players hit the ball all the time on top of the bounce and rush themselves for no reason at all.
They have either been told by coaches that that’s the way to play now (yes, on the ATP level but NOT at the recreational level!), or they simply don’t have good enough ball judgment to know when they could wait for the ball to come to them and hit it at a lower contact point.
As I mentioned before, I believe that hitting the ball at a low contact point when it’s on the way down is one of the tennis fundamentals that everyone has to master if they want to master the game of tennis.
Once you’re comfortable and consistent hitting the ball at a low contact point, move a bit into the court so that you can hit it on top of the bounce.

The next progression is getting comfortable at hitting the ball on top of the bounce.
Remember, you are still working on technique! Your goal is to execute the new technique correctly while challenging yourself with different timings of ball flight and contact.
The last step is to move in even closer and practice hitting the ball on the rise.
Do not hit the ball hard, but just look to time it well and control it well.

Hitting on the rise is always challenging but don't run away from this challenge.
For the final challenge, you can combine all three timings in one sequence.
Start on the baseline, hit the first ball at a low contact point. Then move in and hit the second one on top of the bounce. Finally, move in even closer to hit the last one on the rise.
If you want even more variation while working on your technique, use your creativity to combine change of direction, footwork patterns and different timings.
While you can use each of the last 3 stages just to work on each skill (change of direction, movement and timing), remember that the goal in this training example was to work on your technical flaws while challenging yourself with more variety.
It is very easy to revert back to old habits and get stuck with the same technical flaws if you don’t put in enough repetition with total focus on new movement, and that’s what tennis ball machines are perfect for.

Excellent !!! You always produce the nicest videos. Very educative. Thanks very much.
Fantastic. Very thorough. I recently got a slinger bag.